Lazy Podcaster Whiteboard animation for ideas worth sharing
Build professional-grade animated explainers, digital promotional assets, commercial overviews, brand reels, product demos, and training courses — complete with hand-drawn-style animation, cinematic scene transitions, AI-powered narration, and a plugin ecosystem that never stops growing. Zero artistic skill required. Results that look like you hired a studio.
Need instant help? Lazy Podcaster includes a built-in AI Assistant directly in the editor toolbar. Powered by Gemini and pre-loaded with this entire User Guide, it can answer workflow questions and explain tool options in real time as you build your project.
Guide updated September 21, 2026. Menu names and workflows reflect the current desktop build.
Contents
- What Is This App?
- Quick Start
- AI Assistant
- Camera & Infinite Canvas
- Scenes
- Items
- Narration Timeline Sync
- Animation System
- Appearance Animations
- Presence Effects
- Exit Effects
- Intro Effects
- Ambient & Frame Effects
- Narration
- Narration Captions
- Languages & Translations
- Pen Tool
- Asset Library
- Webcam Capture
- Sketch Tool
- Plugin Library
- Lazy Podcaster Asset Vault
- Image & Talking Characters
- Presentation Mode
- Project History
- Prompt Builder & AI Projects
- AI Image Generation
- New Project from Website (AI)
- Tours & Context Help
- Exporting
- PDF Export
- Sharing Projects
- Best Practices
What Is This App?
Lazy Podcaster is a desktop tool for creating explainer-style animated videos, including digital promotional assets, commercial overviews, and brand reels. You arrange SVG graphics, images, and text on a virtual whiteboard, then the app animates those elements onto the screen as if being drawn in real time by a hand holding a pen. The result is a polished, hand-drawn-style presentation video.
It is not a freehand drawing application. You don't draw anything yourself. Instead, you:
- Place pre-made SVG or image assets on the whiteboard
- Choose how each element animates in (and out)
- Add scene-level effects, transitions, and narration
- Export animated video, scene stills, multi-scene PDFs, or animated GIF captures
- Package a project for sharing, including its project data and assets
- Present live to an audience display or use the project as a presentation
The hand-drawn look comes from the app tracing the paths of each graphic and overlaying a virtual pen image that follows the stroke — giving the impression of live drawing without any actual freehand input from you.
Presentation Mode
Presentation Mode sends the project to an audience display while keeping presenter controls on the main screen. In the playback toolbar above the scene list, click Present Fullscreen to start with Auto-play selected or Live Presentation to start with Presenter-controlled selected. You can change the mode in the setup window, choose an available display, and decide whether audio plays on the audience display.
| Mode | Use it when |
|---|---|
| Auto-play | The project should advance through scenes automatically. |
| Presenter-controlled | You want to advance, restart, or jump between scenes yourself. |
| Kiosk | The audience should see a presentation with minimal presenter interaction. |
During a presentation, the console can show presenter notes, a teleprompter, and a pointer pad. It also provides controls for previous/next scene, restart, scene jump, blank screen, and laser pointer. Audio on the audience display can be enabled before starting.
Presentation Mode requires a native audience display connection. If no compatible display is available, use Preview or export the project instead.
Whiteboard animation is one of the highest-performing content formats on the internet. YouTube channels dedicated to whiteboard-style explainers routinely accumulate millions of views and generate substantial ad revenue. On social platforms like TikTok, Instagram, and LinkedIn, animated explainer content consistently outperforms static posts in both reach and engagement — because it holds attention in a way that no slide deck or talking-head video can match. The creators behind this content are in enormous demand, and many earn a full-time living from it. Lazy Podcaster puts that exact capability in your hands.
Who Uses It
Lazy Podcaster is the creative tool of choice for anyone who needs polished video content without a production team:
📹 Content Creators
Explain complex topics with animated diagrams and hand-drawn graphics. Perfect for YouTube tutorials, educational channels, and social media reels.
📈 Marketers & Sales Teams
Create compelling product demos, commercial overviews, and digital promotional assets that hold attention. Animated videos consistently drive higher engagement than static slides.
🎓 Educators & Trainers
Research consistently shows that students retain information significantly better when they watch it being drawn and explained simultaneously — the so-called “generation effect.” Lazy Podcaster is purpose-built for exactly this. Create lesson videos that unfold one concept at a time, narrated in your own voice or a lifelike AI voice. Export for your LMS, embed in Google Classroom, post to YouTube for students to rewatch, or play directly in the classroom from the app. Produce a semester’s worth of visual lesson material in far less time than it would take to build equivalent slide presentations — and with engagement levels that slides simply cannot match.
💼 Entrepreneurs & Small Businesses
An animated explainer or commercial overview is often the single highest-ROI digital promotional asset a small business can produce. It answers the question “what do you do?” in 60–90 seconds, in a format audiences actually watch to the end. Professional video agencies charge $3,000–$10,000+ to produce one. With Lazy Podcaster you create it yourself — your exact story, your exact message, ready to post on your website, run as a social ad, show at a trade stand, send to a prospect, or adapt into a 9:16 brand reel — without the agency price tag or the back-and-forth of handing your vision to someone else.
💰 Freelancers & Video Agencies
This app is a turnkey business in a box. Businesses everywhere need explainers, commercial overviews, promotional assets, and brand reels, and they pay well for someone who can make them. With Lazy Podcaster you can deliver broadcast-quality animated videos in hours, not weeks. No animation degree. No production team. Just your creativity and a client brief.
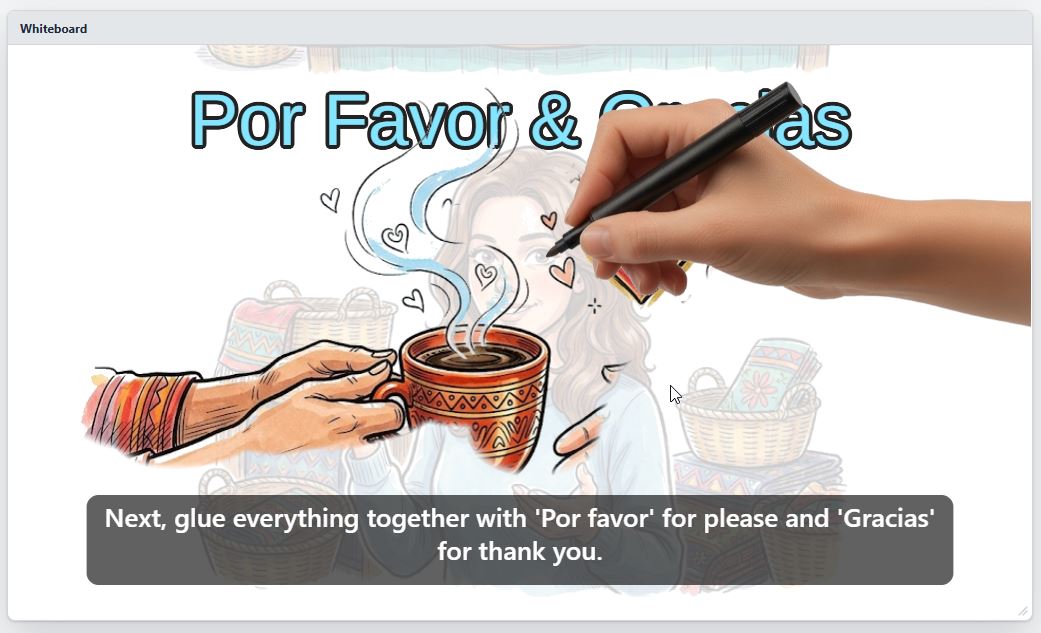 Screenshot: Canvas with items animating in with hand-drawn style
Quick Start
- Create a project. The app opens with a blank project. Choose Settings → Project Settings to pick the aspect ratio (e.g. 16:9 for YouTube) and background color.
- Turn on the AI Assistant. Choose Settings → App Defaults → AI, enable AI Assistant, and save App Defaults for real-time guidance while you work.
- Add a scene. The left sidebar lists your scenes. Click + Add Scene (at the bottom of the scene list) to insert a new scene.
- Add content to the scene. Click the + dropdown on a scene card to add items: an SVG graphic, an image, or a text card. The item appears on the whiteboard canvas.
- Position and resize. Drag items to reposition them. Drag resize handles to change their size. Right-click for more options.
- Choose an animation style. Click the AP pill on an item card to open Item Settings directly on the Appearance tab. You can also use the item card's ⋯ → Appearance Effect menu.
- Add narration (optional). Click the NARR pill on a scene card to open its Narration settings, then enter the narration text and choose a voice.
- Preview. Press the ▶ Play button in the toolbar to preview the animation.
- Export or share. Choose File → Export Video, Export Scene as Image…, Export Scenes to PDF…, or Export for Sharing… depending on the result you need.
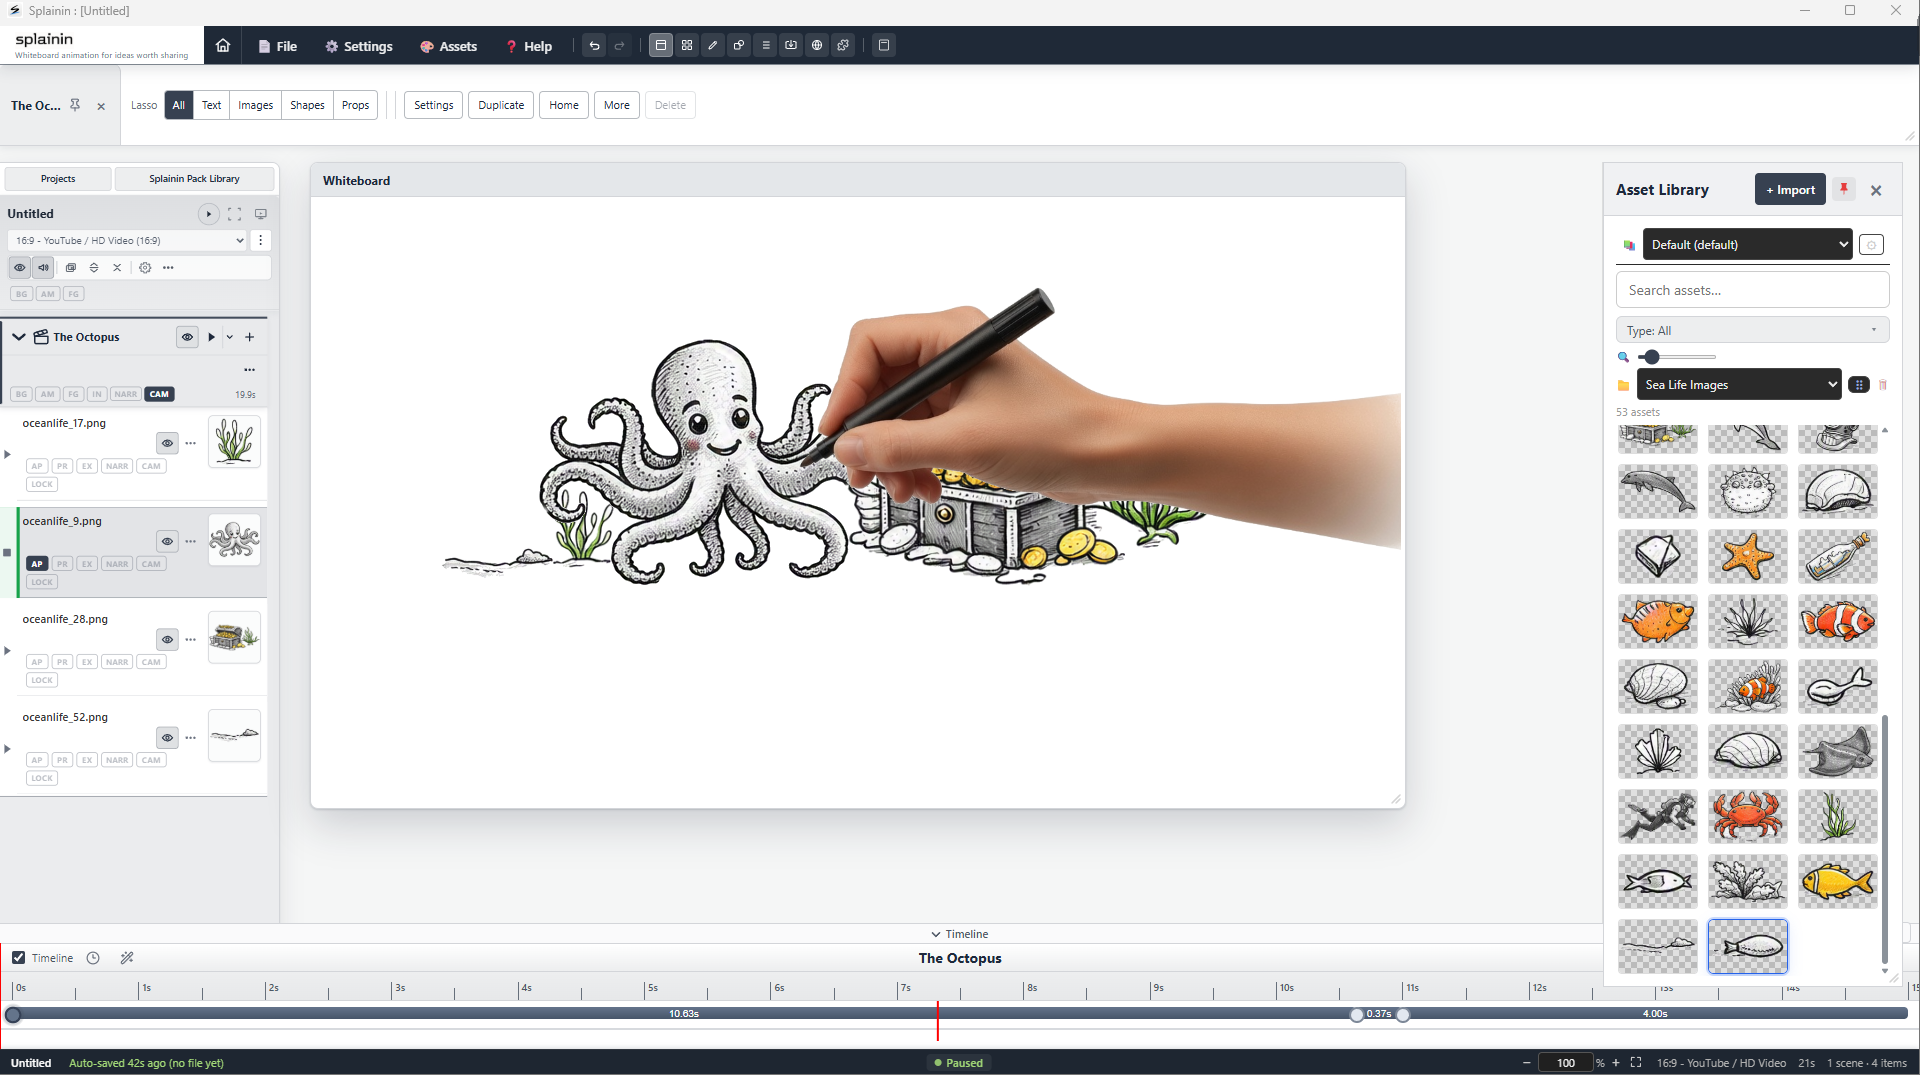 Screenshot: Full app layout — toolbar, sidebar, canvas
Interface Overview
Menu Bar (top)
File, Settings, Assets, and Help menus. Also contains Undo/Redo buttons and quick-access toolbar icons for common actions.
Scene Sidebar (left)
Lists all scenes in order. Each scene shows its item thumbnails as cards. Drag scenes or items to reorder them. Drag the thin divider at the sidebar's right edge to change its width.
Canvas (center)
The whiteboard where items are positioned visually. What you see here is what exports. Right-click items for context menu options.
Playback Toolbar
Play/Stop buttons for previewing the full project or individual scenes. A progress indicator shows playback position.
Resize the Scene Sidebar
To make the Scene Sidebar wider or narrower, point to the thin vertical divider on its right edge. When the pointer changes to a horizontal resize cursor, drag the divider left or right. The sidebar can be between 180 and 600 pixels wide, and Lazy Podcaster saves the chosen width automatically.
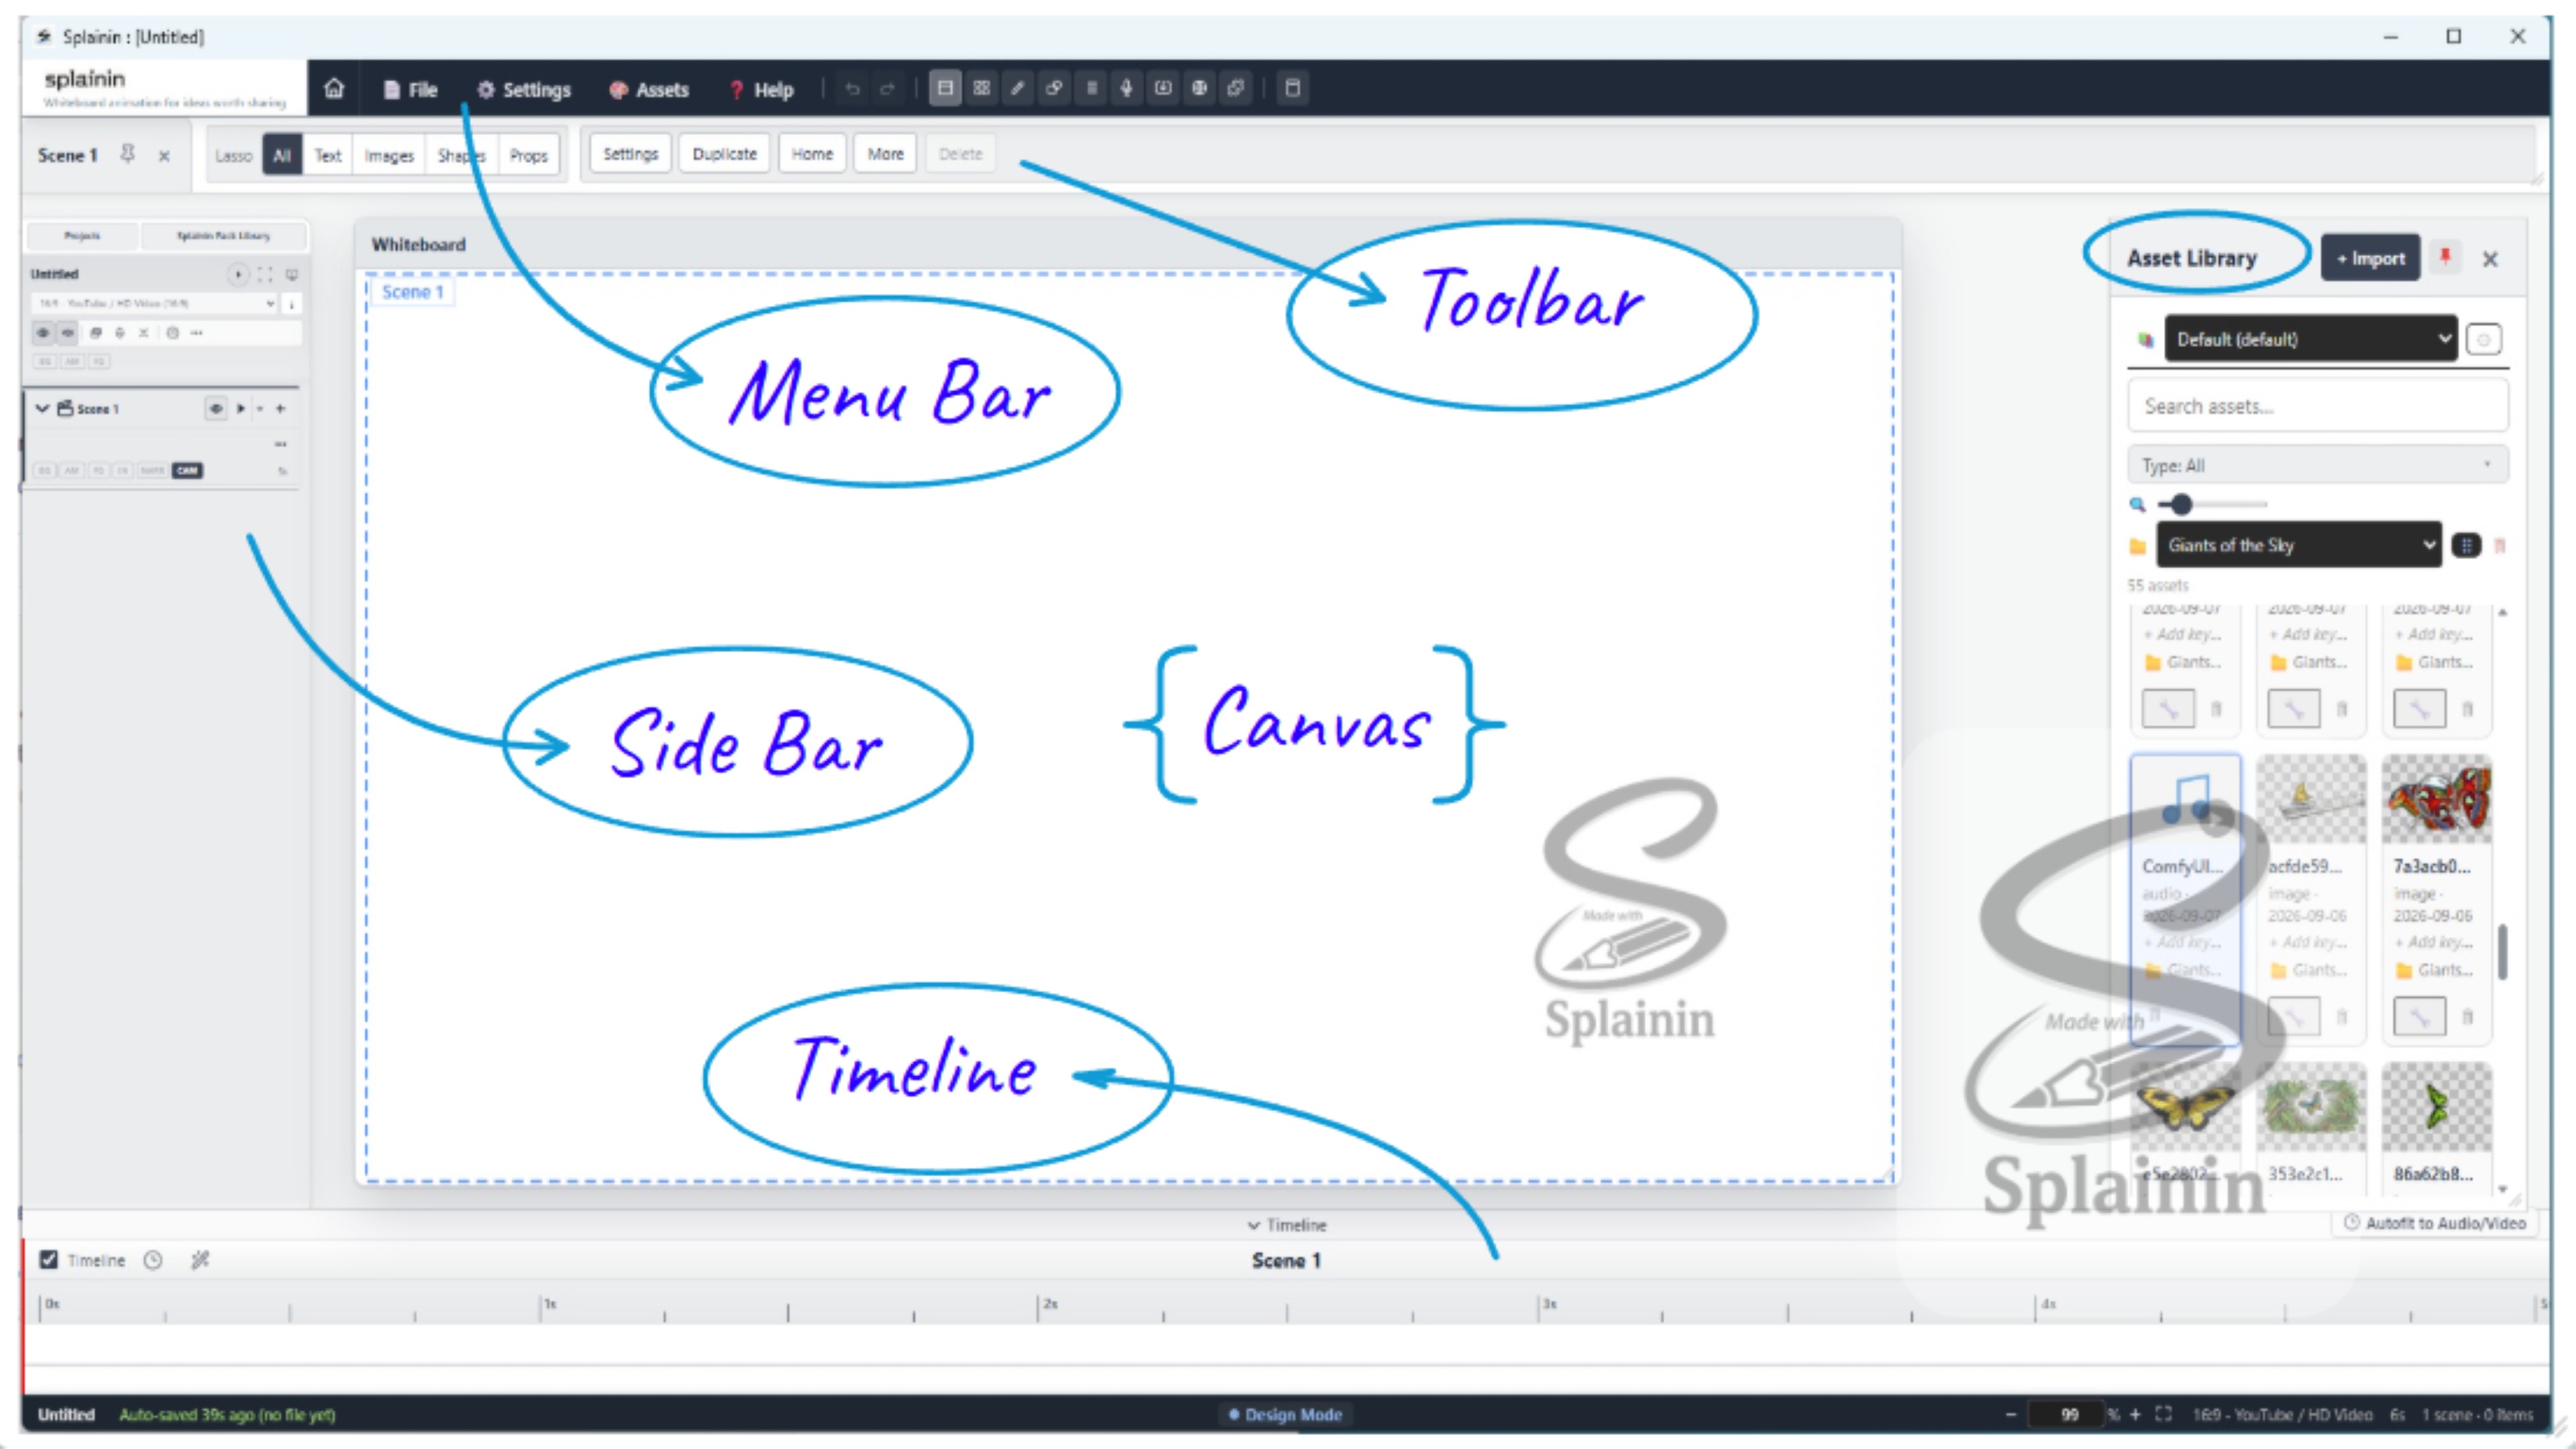 Annotated screenshot: menu bar, scene sidebar, canvas, toolbar
Context Inspector & Dockable Toolbars
The Context Inspector is the selection-aware toolbar area for editing the thing you currently have selected. It can be configured as a docked panel beside the workspace, a floating panel, or hidden when you want more canvas space.
| Mode | What it does |
|---|---|
| Docked | Keeps the inspector in the workspace layout so its controls stay beside the canvas. |
| Floating | Moves the inspector into a draggable floating window that can be repositioned above the workspace. |
| Hidden | Removes the inspector from view. Use the inspector toggle to show it again. |
The available toolbar changes with the current selection. Select an item, group, scene, or text item to reveal the controls relevant to that context. The controls are not a single fixed toolbar; the inspector hosts several tool groups:
| Tool group | Features |
|---|---|
| Lasso filter | Limit drag-lasso, Ctrl+A, and Ctrl+Shift+A selection to All, Text, Images, Shapes, or Props. |
| Common item controls | Adjust opacity; lock or unlock position and size; show or hide items; open Item Settings; duplicate, group, ungroup, or delete selected items. |
| Arrange | Align items left, center, right, top, middle, or bottom; distribute or change spacing; make selected items the same width or height; swap two unlocked items; set a shared Appearance effect; lock aspect ratio; choose video fit mode; and keep selected items always on top. |
| Text format | Change tracking, baseline shift, character width, and line height; apply no caps, small caps, or all caps; align left, center, right, or justify; toggle wrapping; change font size; and reset text styling. Drag the handle to reposition this toolbar. |
| Text font | Choose the font, text color and alpha, outline color, and outline width for selected text items. |
| Shape | Edit shape fill and opacity, solid or gradient fills, gradient angle, border color and opacity, border width, corner radius, edge and tail settings, arrow ends and curves, and shape-specific options such as hexagon halves or speech-bubble direction. |
| Scene | Open Scene Settings, duplicate scenes, jump to a scene's home view, open more scene settings, or delete selected scenes. |
| AI image | Generate visuals for selected annotated image, SVG, or graphic items with a configured AI Image provider. |
Text Outline
Yes. Select the text item, open the Context Inspector's Text font controls, then choose an Outline color and set the Outline width. The outline is applied to the selected text item.
Text Color
Yes. Select the text item and choose its color either from the item card's ⋯ menu or from the Context Inspector's Text font toolbar.
Rotate Text
To rotate text, hold Ctrl and drag the text item's bottom-right resize handle. This rotates the text content inside its frame. Release Ctrl to return to resizing.
Lasso Selection Filters
The Lasso settings in the Context Inspector choose which kinds of items are included by drag-lasso selection and the keyboard selection shortcuts. They do not prevent you from selecting a different item with a direct click.
| Filter | Items included |
|---|---|
| All | All item types. A drag-lasso using this mode can also select scene anchors when the selection rectangle crosses a scene boundary. |
| Text | Text items only. |
| Images | Image, SVG, and graphic items that are not classified as shapes. |
| Shapes | Items classified as shapes, including shapes whose underlying content is SVG or graphic data. |
| Props | Prop items only. |
The selected filter is remembered between sessions. The selection commands apply it as follows:
- Drag on empty canvas: selects matching, unlocked items that intersect the lasso rectangle. The filter remains selected afterward.
- Ctrl+A: selects matching displayed items across visible scenes, excluding transition items. Locked matching items are included.
- Ctrl+Shift+A: selects matching, unlocked items that intersect the current canvas view, excluding hidden and transition items.
After Ctrl+A or Ctrl+Shift+A, the filter returns to All. Choose a type again before the next filtered keyboard selection.
Text Manager
Text Manager is a floating list editor for creating and revising multiple text items in the active scene. Enter one line per item, choose an optional lead such as a bullet, checkbox, dash, arrow, star, or number, and choose a shared Appearance effect.
- Select existing text items before opening Text Manager if you want their text prefilled for editing.
- Edit the lines, choose the lead and Appearance options, then click Update to rewrite the selected text items.
- Click Add to Scene to create new, evenly stacked text items in the active scene. The new items are selected together for further adjustment.
Text Manager creates or updates text items; it is not the Narration Manager. Use Narration Manager for scene and item narration scripts.
Lock Position & Size
Lock Position & Size prevents changes to an item's position and size while preserving it in the project. Locked items remain visible and can still be selected; the lock only protects their layout.
- Select one or more items.
- In the Context Inspector's Common item controls, choose Lock. The control changes to Unlock when every selected item is locked.
- Use Unlock to allow moving and resizing again. Locking and unlocking are recorded in Undo and saved with the project.
Always on Top
For normal scene stacking, the item-card order in the sidebar controls which item appears in front: items later in the scene list render above items earlier in the list. Move an item card later to bring it forward, or earlier to place it behind other normal items.
Always on top pins selected items above that normal scene stack. Use it to keep an image, label, caption, logo, or other foreground element visible when other items appear later.
- Select one or more items.
- In the Context Inspector's Arrange toolbar, enable Always on top. You can also change the setting in the item's Item Settings.
- Leave it enabled while editing or previewing. The pinned item stays above normal items even when those items are added later or appear during playback.
Always on top changes stacking order, not timing or position. It is independent of the item's Appearance, Presence, Exit, and narration settings. Select multiple items to pin or unpin them together.
Where to configure it
Set the default Context Inspector mode in Settings → App Defaults → General → Context Inspector. The inspector's pin control also switches between docked and floating presentation, while the toolbar toggle hides or shows it. Individual floating toolbars remember their positions.
Use Docked for repeated editing, Floating when you want the controls close to a particular canvas area, and Hidden when inspecting the composition without editing.
Camera & Infinite Canvas
The whiteboard is an infinite canvas: all scenes occupy one shared world and can be visible at the same time. Zoom out with the mouse scroll wheel to see more scenes at once, then pan with the middle mouse button to move around the project. The camera changes your editor view without changing item coordinates, layout content, or export framing.
- Pan by pressing and holding the middle mouse button inside the whiteboard, then dragging. Dragging with the middle button moves the camera instead of moving an item or creating a lasso.
- Zoom with the mouse wheel over the whiteboard. The zoom pivots around the pointer, so the content beneath the pointer stays in place. A temporary zoom badge shows the current percentage.
- Zoom with the status bar using the −, percentage field, and + controls. The field accepts 5%–1000%.
- Fit the active scene with the status-bar fit button or Ctrl+0.
- Return to a scene home view by selecting its scene. Lazy Podcaster stores a home camera view for each scene and uses it when returning to that scene.
Navigation and editing are separate
Use ordinary pointer dragging to move or resize selected items; use middle-button dragging to pan the camera. Use the mouse wheel to zoom the camera. While a scene is playing, design-mode camera input is suppressed so navigation gestures cannot disturb playback.
Image or Item Appears in the Wrong Scene
An item's scene assignment and its position on the whiteboard are separate. The scene containing the item in the sidebar is the scene it belongs to for sequencing and playback. Its canvas position is independent, so it can appear inside another scene's outline or anywhere else on the infinite whiteboard without changing that assignment.
The dashed scene outline is not a container or clipping boundary. It shows the area covered by that scene's saved home camera view. Scene camera areas can overlap, which can make an item assigned to one scene appear visually inside another scene's outline.
- If the item is under the correct scene in the sidebar, select that scene to return to its home view, then drag the item to the intended position.
- If the whole scene is in the wrong canvas location, drag the scene-name label on its dashed frame to move the scene camera area and all of that scene's items together.
- Use Move to a different scene only when the sidebar assignment itself is wrong.
Camera during playback
When a project plays, Lazy Podcaster can animate the camera to each scene's stored home view as the scene begins. Intro effects and camera-pacing settings can change how that movement looks. This playback camera motion is separate from the camera position you use while editing.
Camera movement is an editing aid unless a scene or intro effect explicitly animates the camera during playback. Your editor zoom does not change the project's aspect ratio or output resolution.
Item Camera View During Appearance
To have the camera zoom in on an image while it is being drawn, first set the whiteboard camera to the view you want, then open the image item's Camera View menu and choose Custom View (set to current). During playback, Lazy Podcaster moves to that item's saved camera view before its Appearance animation begins, so the image can be drawn in the intended close-up view.
- Zoom and pan the whiteboard to frame the image the way you want it drawn.
- Open the image item's ⋯ menu, or its CAM pill, then open Camera View.
- Choose Custom View (set to current). Use Scene Camera to return the item to the scene's camera, or Inherit (don't move) to prevent an item camera move.
Managing Projects
Projects are saved as .lazypodcaster files (a ZIP-based archive that stores all project data and referenced media).
| Action | How to do it |
|---|---|
| New Project | File → New Project. Prompts to save unsaved changes first. |
| New Project from Outline… | File → New Project from Outline… — paste any outline and Lazy Podcaster builds an entire multi-scene project for you. See below. |
| Open Project | File → Open Project… opens the Projects browser. Choose a recent project, browse a project folder, or select Open from File… to choose a .lazypodcaster file from your computer. |
| Recent Projects | File → Recent Projects → choose from the submenu. |
| Save | File → Save or Ctrl+S |
| Save As | File → Save As… to save under a new file name or location. |
| Export for Sharing | File → Export for Sharing… creates a portable .lazypodcasterpack bundle. See Export for Sharing. |
| Project Outline | File → Project Outline… opens the project's outline view for reviewing or reusing its structure. |
| Project Info | File → Project Info… opens project metadata and information. |
| Delete Project | File → Delete Project… permanently deletes the saved project file and all history after confirmation, then opens a new blank project. |
The Projects window opens on Recent projects, showing the same projects in the same order as File → Recent Projects, across folders. Each card shows its saved location; missing projects remain listed with an unavailable message. Search and the favorites filter narrow the visible list.
Choose Browse folder to explore the selected Projects Library folder. Its sorting options, including Recently modified in this folder, apply only to that folder. Grid and list views, previews, favorites, and pinning remain available.
Click New Project... in the Projects window to switch to the existing New Project window. This only opens the creation window; it does not create or replace your current project.
Lazy Podcaster auto-saves about two seconds after a change. If the app closes unexpectedly, reopen it and Lazy Podcaster automatically restores the last completed auto-save from local recovery storage. Changes made immediately before a crash may not have finished saving, so use File → Save or Ctrl+S after important milestones.
Project History
Saved projects can keep snapshots inside the .lazypodcaster file. Open File → Project History… to review earlier states of the current project.
- Save the project to a
.lazypodcasterfile first. - Open File → Project History… and review the dated snapshots.
- Restore the snapshot you want, or delete an old snapshot and use Undo if you change your mind.
Project History is stored with the saved project. Save after important milestones so the latest snapshot and project contents are both preserved.
Delete a Project
Delete Project is not snapshot deletion. File → Delete Project… permanently removes the saved .lazypodcaster file and all of its history from disk. It cannot be undone. An unsaved project has no file to delete.
New Project from Outline
This is one of the fastest ways to get a video off the ground. Give Lazy Podcaster an outline — a numbered list, a bulleted list, a set of headings, a screenplay-style script, or even a few paragraphs separated by blank lines — and it will build a complete multi-scene project for you in one shot. Each entry in your outline becomes its own scene, with a name, a placeholder text item, a placeholder graphic slot, optional spoken narration, and a duration that matches the spoken length.
Open it from File → New Project from Outline…
How to Use It
- Choose File → New Project from Outline… A dialog opens with a large text box and a live Preview panel.
- Paste your outline into the text box — or click 📋 Paste from Clipboard.
- Watch the Preview update as you type. Each parsed scene appears with an editable Title and editable Narration so you can adjust before committing.
- Leave Generate TTS narration & auto-set scene duration checked if you want Lazy Podcaster to also speak the narration aloud and time each scene to match the audio length. Uncheck it if you'd rather just get the scene skeleton.
- Click Create Project. Lazy Podcaster builds the project from scratch — you'll see a progress overlay as scenes are added.
What You Can Paste
The outline parser is deliberately forgiving. All of these work:
Numbered or bulleted lists
Each list item becomes a scene. Markers like 1., 1), (1), a., i., *, -, •, ◦, etc. are all recognised and stripped automatically.
Markdown headings
Lines starting with # through ###### become scene titles. The body underneath becomes that scene's narration.
"Scene 1:" / "Step 2:" labels
Phrases like Scene 1, Step 2, Chapter 3, Part 4, Section 5, Slide 6 are recognised as scene boundaries.
Blank-line paragraphs
If you just have prose with blank lines between paragraphs, each paragraph becomes a scene.
Title : description pairs
A line like The Problem: Describe the pain point turns into a scene titled The Problem with the rest as narration.
Screenplay-style notes
Lazy Podcaster recognises labels like Narration:, Voiceover:, VO:, Script:, Say:. The text after the label becomes the spoken narration; visual/description/notes labels are routed to the scene's annotation instead.
What Each Scene Gets
| Element | Filled in with |
|---|---|
| Scene name | The first line of the entry (truncated to 80 characters if needed). |
| Narration | The remaining text — or, if labels like Narration: were used, just the spoken portion. If TTS is enabled, this is also rendered as audio. |
| Duration | If TTS is on, set to the spoken audio length plus a half-second buffer. Otherwise estimated from word count. |
| Text item | A starter text card pre-filled with the scene title, sized at ~75% of the canvas and placed near the top — ready for you to style or replace. |
| Graphic placeholder | An empty graphic item, ready for you to drop an image, SVG, GIF, or hand-drawing onto. |
| Annotation | A note on the scene containing any leftover non-narration text from the outline (visual descriptions, production notes, etc.) so nothing from your original outline is lost. |
An extra "Outro" scene with the narration “Thanks for watching!” is appended at the end. Delete it or edit it to taste.
This pairs perfectly with an AI assistant. Ask ChatGPT, Claude, or your favourite chatbot for a 10-scene outline on any topic, copy the result, paste it into the outline dialog, and you'll have a fully-narrated draft video in under a minute. Then refine each scene visually.
Creating a new project replaces the project you currently have open. Save your work first if you'd like to keep it.
If TTS narration is enabled, Lazy Podcaster uses the voice currently selected as your default narration voice (see Narration & Voices). Premium voices that bill per character will be charged for each scene's narration during creation, so for very long outlines you may prefer to leave TTS off and bake voices later.
New Project from Website (AI)
New Project from Website (AI) turns the readable content of a public webpage into source material for an AI-generated Lazy Podcaster project. It creates a grounded project prompt from the page; it does not copy the webpage's visual layout or download its images.
- Choose File → New Project….
- Under Start Fresh, choose New Project from Website (AI).
- Enter a public
http://orhttps://address and choose the project's purpose, structure, tone, runtime, and other Prompt Builder options. - Click Fetch Website & Generate Prompt. Lazy Podcaster retrieves the page and reports how many usable characters it found.
- Generate with a configured AI Script provider, or use Copy & Open AI/Copy and paste the prompt into an external AI.
- Review the returned JSON in Prompt Builder and choose Create Project Now. When provider auto-create is enabled, Lazy Podcaster can create the project immediately after generation.
What Lazy Podcaster reads
Lazy Podcaster extracts the page title, description, headings, paragraphs, lists, definitions, and quotations. Navigation, forms, scripts, styles, hidden content, and other non-content elements are removed. Up to 30,000 characters of usable page text are included as authoritative source material for the site's messaging, terminology, benefits, factual claims, and call to action.
The generated prompt treats webpage content as reference data and tells the AI to ignore instructions embedded in that content.
The page must be publicly reachable. Sites that require sign-in or render all meaningful content only after JavaScript runs may return no usable text.
Prompt Builder & AI-Generated Projects
The Prompt Builder creates a detailed, copy-ready prompt for an AI assistant. You do not need a website URL: start with a video topic or subject, fill in the guided fields, or paste a complete brief. It is designed to work with most general-purpose AI tools, including ChatGPT, Claude, Microsoft Copilot, Gemini, and any other provider where you can paste a prompt and receive JSON back.
Open Prompt Builder
Open File → New Project from Outline…, choose Generate a New Project with AI, then click Open Prompt Builder. To build a reusable template instead, open the same window's Template Builder → Create a new template from scratch → Open Prompt Builder. The Prompt Builder is a floating window with an AI provider selector and a form for defining the project you want. The selected AI site comes from your enabled Browser Sites list; Lazy Podcaster remembers the provider you last used.
Choose the output
| Output | Use it for |
|---|---|
| Reusable Template (JSON) | A reusable project structure with scenes, elements, effects, and global effect layers, without committing to one specific subject. |
| Custom Video Outline (JSON) | A complete new project. Choose a purpose, structure, tone, scene count, target runtime, and must-include details. |
| Custom Single Scene (JSON) | One rich scene to add to an existing project. |
| Project from a Plain-Text Outline (JSON) | Convert an outline you already wrote into the structured project JSON Lazy Podcaster can import. |
All Prompt Builder options
Input method
| Option | What it does |
|---|---|
| Fill in individual fields | Shows the Purpose, Structure, subject, tone, scene count, runtime, and must-include controls. |
| Paste a complete brief | Lets you paste a brief containing fields such as Title, Description, Category, Purpose, Structure, Tone, and a consolidated generator payload. |
Structure options
| Structure | Shape of the project |
|---|---|
| Story | A narrative arc with setting, protagonist, conflict, climax, resolution, and takeaway. |
| Sequential / Steps | Ordered steps, one per scene, ending with a recap. |
| Ranked List | Ranked points revealed one per scene. Adds a Countdown or Count up choice. |
| Open List | Distinct unranked points, each with why it matters, followed by a takeaway. |
| Timeline | Chronological milestones. Adds Forward or Reverse chronological direction. |
| Single-Loop Domino Progression | A compact mechanical or survival chain reaction designed to loop back into its opening. |
| Comparison / Before-After | First state, turning point or contrast, second state, and result. |
| Concept Build-up | A hook question followed by an idea built up with plain analogies. |
| Problem → Solution | Problem, solution, benefits, proof or result, and closing takeaway. |
| Multi-Category Summary | One scene per knowledge category, ending with a synthesis. |
| Reveal | Tease and withhold, deliver a hero reveal, then show the payoff and call to action. |
| Hook → Hit → CTA | Fast hook, one sharp core message, and one direct call to action. |
| Phased Overview | Roadmap followed by one scene per named phase or stage. |
| Concept Breakdown | Whole concept followed by its component parts and how they fit together. |
Purpose options
| Purpose | Emphasis |
|---|---|
| Explain | Make a concept clearly understood. |
| Deconstruct / Analyze | Break down physical mechanics and interacting parts. |
| Simulate / Expose | Make an invisible internal biological, chemical, or mechanical process visible. |
| Tell / Narrate | Let the story carry the message. |
| Immersive Poetic Visualization | Bring a poem's language, imagery, and rhythm to life. The Must Include field becomes the poem text. |
| Teach / How-To | Equip viewers to perform a task clearly and practically. |
| Pitch | Persuade viewers to want or adopt something. |
| Demo | Showcase features and benefits. Adds an optional feature-highlights field. |
| Update / Status | Summarize progress, current work, next steps, blockers, or asks. |
| Announce | Deliver a change or decision and explain who it affects and what happens next. |
| Recognize / Spotlight | Celebrate a person or team and their impact. |
| Myth-bust | Name a misconception, explain why people believe it, and correct it. |
| Quick Tips | Give immediately usable advice. |
| React / Commentary | Offer an honest point of view and closing verdict. |
| Entertain / Storytime | Entertain first, with a light takeaway. |
| Reinforce | Help learners review and retain key information. |
Target runtime
Complete-project prompts can target Auto (recommended), 35–45s Short / Fast-Paced High-Retention Loop, 30–60 seconds, 60–90 seconds, 2 minutes, 3 minutes, 5 minutes, 7 minutes, 10 minutes, 15 minutes, 20 minutes, 25 minutes, or 30 minutes. Runtime guidance affects scene count, narration density, visual beats, and pacing. Single-scene prompts do not use the project runtime selector.
Image style
Choose Hand-drawn line art (default), Vividly colorful, elaborate hand-drawn illustration, Clean flat vector illustration, Detailed technical diagram, or Bold monochrome silhouette. The selected style is applied consistently to every image description and remembered for the next prompt.
Image appearance
Choose the entrance animation applied to every generated image and SVG element. The default is None; Draw, Fade in, Slide in, Drop in, and Pop in are also available.
Images per scene
Choose Auto (recommended), Maximum 1 image per scene, 1–2 images per scene, 1–3 images per scene, or 2–3 images per scene. Lower limits encourage the AI to create additional scenes for distinct visual beats when the selected structure, scene count, and supplied outline allow it. Poetry uses its own line-by-line image rules.
Visual cadence and scene intro transition
Visual cadence can remain Standard / content-driven, or require exactly one new image in a new scene every 3–6 seconds, 10–15 seconds, or 20–30 seconds. A fixed cadence calculates a required scene-count range from runtime, requires the summed scene durations to match the selected runtime, and disables manual scene count and image-density choices. Podcast prompts also reserve their final scenes for a recap, takeaway, sign-off, and context-appropriate invitation or call to action. Scene intro transition can remain None or apply Camera Pan — Ken Burns, Ease In-Out (smooth), 3.0s to every scene.
Conditional fields and rules
- Scene count is available for guided complete-project prompts; leave it blank to let the AI adapt the count to the subject and runtime.
- Image style controls the art direction used in every generated image description.
- Image appearance controls the entrance animation used by every image and defaults to None.
- Images per scene controls visual density independently of runtime and is remembered for the next prompt.
- Visual cadence can enforce one-image scenes at the selected frequency and is remembered for the next prompt.
- Scene intro transition can apply the selected intro configuration consistently to every generated scene.
- Must include adds required names, facts, taglines, questions, or other instructions. For Poetry, it is the authoritative poem text.
- Tone is optional. Poetry has a built-in lyrical default unless you replace it.
- Subject fields change with the selected Purpose. Some Structures add their own fields, such as Ranked List direction and Timeline direction.
- Project-only fields are hidden when generating a single scene, because they describe the whole project rather than one scene.
- Template output hides subject-specific project controls and instead offers an optional reusable template brief.
Build the prompt
- Choose the output type.
- For guided project prompts, choose a Purpose such as Explain, Teach / How-To, Demo, Pitch, Story, Myth-bust, Quick Tips, or Reinforce.
- Choose a Structure such as Story, Sequential / Steps, Ranked List, Timeline, Comparison / Before-After, Problem → Solution, Reveal, Concept Breakdown, or another available format.
- Enter the subject and any format-specific details. Choose an image style, then add any optional tone, scene count, target runtime, and must-include instructions.
- For a plain-text conversion, paste the outline instead. For a reusable template, describe the kind of video and expected beats rather than one concrete project.
- Click Generate Prompt.
Send the prompt to an AI
After the prompt is generated:
- Copy & Open AI copies the prompt and opens the selected AI provider.
- Copy copies the prompt so you can paste it into any AI manually.
- Save to Prompt Manager stores the prompt in the shared Project Templates prompt library for reuse.
Tell the AI to follow the requested JSON schema exactly. Copy the AI's JSON response, including the complete object. The New Project from Outline flow accepts the generated Project Layout or Project Template JSON; it can also extract a JSON object from a response wrapped in a single ```json code block. The image prompts in that JSON are the handoff to the second visual-generation pass.
What the generated project contains
A rich AI-generated project can arrive with the project structure already planned instead of only a list of scene titles:
- Project title and metadata such as description and category
- Scenes with titles, durations, and scene-level narration
- Visible text elements with content, intent, emphasis, appearance, and styling
- Image or SVG elements with detailed image descriptions, visual intent, appearance, duration, and their own narration
- Camera, transition, emphasis, background, foreground, and global effect settings
- Per-image narration designed to synchronize spoken words with the visual beat
Image creation is a deliberate second pass. The first AI response creates the Lazy Podcaster project JSON and writes an image prompt in each visual placeholder's annotation. You can generate those images inside Lazy Podcaster with a configured AI Image provider, or use an image-generation website and bring the results back into the app. The project JSON does not embed image bytes, so the visuals remain easy to replace.
Complete the two-pass AI workflow
- Plan the project. Use Prompt Builder, send its prompt to an AI, and copy the returned JSON into New Project from Outline….
- Create the project. Lazy Podcaster builds the scenes, visible text, narration, durations, effects, and image placeholders from the JSON.
- Generate the visuals. Select annotated image placeholders and use the Context Inspector's AI Image controls, or copy their prompts into an image-generation website. The prompts are already written to match each scene's visual intent.
- Review or import. Review in-app results as Lazy Podcaster presents them, or drag externally generated images onto their matching placeholders. You can also import external results through the Asset Library.
- Review and refine. Check the composition, crop, narration timing, and image-to-narration match. Replace any visual without rebuilding the whole project.
Import the AI result
- Open File → New Project from Outline….
- Paste the AI's JSON response into the outline field. The preview should show the parsed scenes and rich elements.
- Review the scene titles, narration, text, image descriptions, durations, and effects.
- Click Create Project. Lazy Podcaster builds the project from the JSON and adds the planned items and metadata.
A Custom Single Scene response can be inserted into the current project through the scene/JSON import flow, while a Reusable Template response can be saved in the template library and used as a starting point for later projects.
AI Image Generation
Yes, Lazy Podcaster can generate project images from within the app when you configure a supported AI Image provider. It also supports a browser-based copy-and-paste workflow when you do not want to configure a provider API key in Lazy Podcaster.
Generate inside Lazy Podcaster with an API key
Lazy Podcaster includes AI Image providers for Google Gemini and OpenAI. Installed .wbimage plugins can add other supported providers.
- Add the image-generation prompt to the item's annotation. Select one or more image, SVG, or graphic items; each selected item must have an annotation containing its prompt.
- Show the Context Inspector if it is hidden. Its AI Image controls appear while an image-capable item is selected.
- Choose a provider and model, enter that provider's API key when requested, and choose a quality option when the provider offers one.
- Click the Generate images sparkle button. Selecting it again while generation is running cancels the requests.
- Review each generated result. Importing an accepted result adds it to the Asset Library and replaces the image item whose annotation supplied that prompt. Closing a review without importing skips that result.
You can select several annotated image items at once. Lazy Podcaster generates them independently, keeps successful results when another request fails, and reports generation, import, skip, and failure progress.
Generate through a browser without a Lazy Podcaster provider key
- Open Lazy Podcaster's built-in browser from the toolbar, or use an external browser.
- Copy the annotation prompt from the image placeholder and paste it into the image service you want to use.
- Generate and save the image, then drag it onto the matching placeholder or import it through the Asset Library.
This route does not require an AI Image provider key to be saved in Lazy Podcaster, although the website you choose may require its own account or subscription.
Which method should you use?
| Method | Best when |
|---|---|
| In-app provider | You have a supported provider API key and want to generate, review, import, and replace one or several placeholders without leaving the project workflow. |
| Browser copy/paste | You prefer a particular web image service, do not have a supported provider key configured in Lazy Podcaster, or want more manual control before importing a result. |
Project Settings
Open via Settings → Project Settings. The modal has 16 tabs:
| Tab | What you configure |
|---|---|
| General | Project name, description, category, tags, and proof-video links used by publishing features. |
| Layout | Active-layout aspect ratio and dimensions, items per new scene, scene layout pattern, and grid size. |
| Export | Extra final-frame hold time for video exports. |
| Colors | Project color preset plus line, text, background, border, and accent colors. |
| Ambient | Project-default ambient effect, design-mode preview, appearance, delay, and plugin settings. |
| Background | Project-default animated background effect, preview, appearance, delay, and plugin settings. |
| Foreground | Project-default foreground effect, preview, appearance, delay, and plugin settings. |
| Intro | Project-default scene intro effect and duration, with a command to reset scenes to that default. |
| Item Defaults | Project defaults for item Appearance, Presence, Exit, and Camera View. |
| Camera Pacing | Snappy, Balanced, Smooth, or Custom scene/item camera-move timing. |
| Border | Project frame effect, color, and plugin-specific settings. |
| Pen Tool | The project's pen or the App Default pen, plus access to the Pen Library. |
| Watermark | A project-specific watermark, preview, placement, size, opacity, backing plate, and logo. |
| Audio | Project background music and volume plus drawing-sound enablement and volume. |
| TTS Audio | Project voice override, speech speed, timeline auto-arrangement, and narration-caption defaults. |
| Annotations | Bulk placeholder/dismiss behavior, text replacement, and removal of project annotations. |
Aspect Ratio & Canvas Size
Choose from common presets or enter custom pixel dimensions:
| Preset | Best for |
|---|---|
| 16:9 | YouTube, HD Video, Presentations (widescreen) |
| 9:16 | YouTube Shorts, TikTok, Instagram Reels |
| 1:1 | Instagram / Facebook square posts |
| 4:5 | Instagram / Facebook portrait posts |
| 21:9 | Ultrawide / cinematic video |
| 4:3 | Standard presentation slides |
| Custom | Any pixel dimension you need |
Project Layouts
A project layout is a version of the same project structure with its own aspect ratio and layout data. Use layouts to make a landscape version for YouTube, a portrait version for Shorts, or a language-specific version without maintaining separate project files. Layouts share the project's underlying scenes and assets, while layout-specific geometry, camera state, and presentation settings can differ.
Create a layout
- Use the layout selector in the project header to see the active layout, then open its ⋮ Manage project layouts menu.
- Choose New from Current… to copy the current layout, or Duplicate to make a named copy without changing its language.
- Enter a layout name, choose an aspect-ratio preset or Custom dimensions, and choose the language for the layout.
- Click Create. Lazy Podcaster switches to the new layout and adapts text boxes to the new canvas dimensions.
Manage layouts
| Command | What it does |
|---|---|
| New from Current… | Creates a new layout from the current layout, with a new name, aspect ratio, and language choice. |
| Duplicate | Creates a same-language copy of the active layout. |
| Rename… | Changes the active layout's name. |
| Change Language… | Assigns another existing language or creates a new translated language for the active layout. |
| Import from Project… | Copies a layout from another project into the current project, then asks for the imported layout's name. |
| Delete | Deletes the active layout. A project must always retain at least one layout. |
If you delete the final layout using a language, that language's text, narration, timing, and baked audio are deleted too. Changing the language of the final layout using a language has the same warning.
Languages & Automatic Translation
Each layout has its own language assignment. Several layouts can use different languages while sharing the same project scenes and assets, so one project can contain English, French, Spanish, and other localized versions alongside different aspect ratios.
- When creating a layout, choose Create new language… in the Language field. You can also choose ⋮ → Change Language… on an existing layout.
- Choose a language from the supported language catalog, such as English variants, French, German, Spanish variants, Portuguese variants, Chinese, Japanese, Korean, Arabic, Hindi, and many others.
- Under Translate with, choose None - copy original text to create the language without translating, or choose an installed translation provider.
- If automatic translation is unavailable under your license, choose None - copy original text, create the language, then edit the copied text and narration manually.
- If the provider requires an API key, choose Enter API Key and save the provider settings, or choose Get API Key to open the provider's key page. The provider status must say it is ready.
- When a provider is ready, the button changes to Create & Translate. Creating the layout automatically translates the project's text and narration into the selected language.
- Preview the new layout, check text wrapping and names, then generate its narration audio before exporting.
What automatic translation includes
- Text card content, including rich-text runs and line breaks
- Scene narration
- Item narration
When translated text or narration changes, Lazy Podcaster clears the affected baked narration audio so it can be regenerated in the new language. Translation does not automatically redesign the visual composition; longer text may need a smaller font, a wider text box, or a different position.
Automatic translation happens while the new language layout is being created only when a ready provider is selected. If no provider is selected, Lazy Podcaster copies the current language's text and narration instead.
App Defaults
Open via Settings → App Defaults. The modal currently has 19 tabs:
Settings → Global Screen Capture… is a shortcut that opens App Defaults directly on the Screen Capture tab.
| Tab | What you configure |
|---|---|
| General | App-wide behavior settings |
| AI | Enable the AI Assistant and choose which project context it may attach |
| API Keys | Save, replace, or remove personal provider keys used by Assistant, translation, AI images, project generation, narration, and installed plugins |
| Layout | Default aspect ratio, canvas size, number of items per scene |
| Background | Default background color and image for new projects |
| Colors | UI color scheme (6 built-in presets + custom); affects sidebars and captions |
| Animation | Default animation style for graphics, text, and images; SVG drawing detail level |
| Audio | Default project background music and volume |
| Drawing Sound | Default pen and drawing sound behavior |
| Transitions | Default transition type, direction, easing, and pan behavior |
| Exit Effect | Default exit animation for items |
| Camera View | Default camera view and canvas navigation behavior |
| Camera Pacing | Default pacing for camera movement between scenes |
| Intro Effect | Default scene intro effect and related settings |
| Pen Tool | Active pen image and optional pen-tip particle effect |
| Watermark | Optional logo overlay on exported video; position, size, and opacity |
| Storage | Default save folders for projects, video, SVG, audio, and plugins |
| Screen Capture | Defaults for screen and video capture, including recorder behavior |
| TTS Audio | Default narration audio behavior and voice-related preferences |
Set the Default Whiteboard Background Color
To use a different whiteboard color for future projects, open Settings → App Defaults → Background, choose the Color, and save App Defaults. This changes the starting background color for new projects. It does not change projects that already exist; use Settings → Project Settings to change an existing project's background color.
Project-creation defaults affect new projects. App-wide preferences, including the AI Assistant controls, take effect when you save them.
AI Assistant
The AI Assistant is a read-only Gemini-powered helper for questions about Lazy Podcaster and the project currently open in the editor. It can explain documented workflows and describe the bounded project context attached to a request, but it cannot edit the project or run app commands.
Find, open, and configure it
Look for this robot icon in the main toolbar, or choose Help → Lazy Podcaster Assistant.
- The Assistant is enabled by default and opens on every normal startup after the license agreement is accepted, unless you disable it in App Defaults. Click its robot icon in the main toolbar or choose Help → Lazy Podcaster Assistant to reopen it during a session.
- Use the compact Settings link in the Assistant, or open Settings → App Defaults → AI, to enable or disable it and choose whether screen and document context may be attached.
- The included daily allowance works without an API key. To use your own Gemini quota, open Settings → App Defaults → API Keys to save a Google Gemini key, then select its model under App Defaults → AI.
The included daily allowance does not require a Lazy Podcaster license. Saving a personal Gemini API key requires any paid Lazy Podcaster license; it does not require a separate Enterprise edition.
The Assistant opens as a floating window below the menu bar. Drag its caption to move it and drag an edge or corner to resize it. Lazy Podcaster remembers its position and size and keeps the full window inside the available app area. Clicking the toolbar icon while the window is already open raises it and flashes its border; use the caption's close button to hide it for the current session. Closing it does not disable it or keep it closed on the next launch.
What each request can include
| Control | Attached context |
|---|---|
| Screen | A current image of the whiteboard canvas. |
| Document text | Bounded project and active-scene details plus text from selected items, or from active-scene items when nothing is selected. |
| User Guide | Relevant sections of this shipped guide, selected from the question and recent user questions. |
The badge in the Assistant always states the active project-context mode: Screen + document attached, Document text attached, Screen attached, or No project context. Change those attachments under App Defaults → AI. When you use the included allowance, the question, relevant guide sections, and only the enabled project context pass through Lazy Podcaster's AI service to Google Gemini. When you configure your own Gemini key, the desktop app sends the request directly to Google through its native network bridge. A Screen attachment is input context only; the Assistant returns text and does not generate images.
Included Allowance vs. Personal API Key:
- Included daily allowance: When using the built-in service without an API key, the Assistant displays the number of prompts remaining in your daily allowance and when it resets.
- Personal Gemini API key: If you configure your own Gemini key in Settings → App Defaults → API Keys, Lazy Podcaster's daily prompt limit does not apply — requests connect directly to Google using your own account's quota. Having your own key also expands the Assistant's creative scope, giving you a full creative co-pilot for scriptwriting, brainstorming, social media optimization (such as sizing and formats for X.com, YouTube, TikTok, and Instagram), and video production workflows.
On an unregistered installation, the Assistant may briefly mention a documented licensed benefit when it is directly relevant to the question. It answers the question first and may show an Open Registration button. Registered installations do not receive this registration prompt.
AI responses can be incomplete. For Lazy Podcaster capabilities and menu paths, the Assistant is instructed to rely on the supplied User Guide and say when the guide does not establish an answer.
Conversation controls
- Press Enter to send; use Shift+Enter for a new line.
- Stop cancels the active request.
- The trash button clears the in-memory conversation.
- The copy button on an Assistant response copies only that response's plain text.
- Disabling the Assistant aborts its active request, clears its conversation, and hides its toolbar icon and window.
Scenes
A project is organized into scenes — like scenes in a movie. A scene is a group of items (graphics, text, props) that animate in together, accompanied by narration, to deliver one point or beat in your story. Scenes play in order from top to bottom in the sidebar.
Adding & Organizing Scenes
- Click + Add Scene at the bottom of the scene list.
- Drag scenes up or down to reorder them.
- Click the ⋯ (ellipsis) on a scene card for a menu with options including rename, duplicate, delete, settings, and effect controls.
Scene Settings
Open Scene ⋯ → Scene Settings. The modal has nine tabs:
| Tab | What you configure |
|---|---|
| General | Scene name, duration, and whether automatic timeline arrangement inherits the project default, is on, or is off. |
| Music | An optional scene audio file, preview, and volume. Project audio is shown when it is also configured. |
| Narration | Scene narration text, provider, voice, recording, speed, volume, preview, saved audio, and caption override. |
| Frame | A frame effect and its plugin-specific settings. |
| Background | A background effect, design-mode preview, appearance effect, delay, and plugin settings. |
| Ambient | An ambient effect, design-mode preview, appearance effect, delay, and plugin settings. |
| Foreground | A foreground effect, design-mode preview, appearance effect, delay, and plugin settings. |
| Intro | The scene's intro effect and plugin-specific settings. |
| Item Defaults | Scene defaults for item Appearance, Presence, Exit, and Camera View. |
Sequential vs. Simultaneous
Each scene has an Enable Timeline toggle (on the scene's ⋯ menu) that controls how items in the scene play. The two modes give very different feels.
Sequential — Timeline ON (default)
Items animate one at a time, in sidebar order. Each item waits for the previous one to fully finish its entrance before it starts. The full appearance animation plays out at whatever duration you've set on the item.
Best for the classic explainer-video feel — a step-by-step reveal that follows along with the narration.
Simultaneous — Timeline OFF
All items start animating at the same instant when the scene begins. To keep things from feeling sluggish, entrance animations are automatically capped (around 1.5 seconds max) so everything lands quickly together.
Best for static-style scenes where the whole composition should appear at once — think title cards, summary slides, infographics.
How Timing Works
| Concept | What it means |
|---|---|
| Item duration | How long each item's entrance animation takes to play out — for example, how long the pen spends drawing an SVG, how long a Fade In takes to fade up, or (for props) how long the prop runs. Set on the item itself (default 3s). Once the entrance finishes, the item stays on screen for the rest of the scene unless you've set an exit effect. In sequential mode, longer item durations push back when the next item starts. |
| Scene duration | How long the whole scene runs before advancing to the next scene. With automatic timeline arrangement off, you set it manually. When automatic arrangement is on, Lazy Podcaster fits it to the measured narration, video length, and pacing. |
| Narration | Plays alongside the animation in either mode. With automatic arrangement enabled, baked narration length controls item placement and can determine the scene duration; without it, set the scene duration long enough to cover the narration yourself. |
| Per-item delay (Simultaneous mode, props only) | When timeline is off, each prop item gets a Delay slider (0–5 s) in its Configure tab. Use it to stagger props relative to the scene start. |
Lazy Podcaster remembers separate effect choices and durations for each mode. Set up a sequential version, toggle Timeline off to try a simultaneous version, and toggling back restores everything you had before.
Transitions are skipped in Simultaneous mode because they only make sense when items animate one after another.
Automatic Narration Timeline Sync
When Keep scene timelines automatically arranged is enabled, Lazy Podcaster keeps timeline positions and scene duration aligned with measured narration, video length, and pacing settings. This is separate from simply displaying narration audio on the timeline.
Enable it
- Open Settings → Project Settings and enable Keep scene timelines automatically arranged for the project default, or open Scene Settings and set Auto-arrange Timeline to On.
- Leave the scene set to Use project default to inherit the project choice, or set an individual scene to Off to override it.
- Generate or update narration audio. Lazy Podcaster measures baked narration before arranging; paid TTS providers may charge when audio must be generated for measurement.
What it synchronizes
- Scene narration creates a timing gate before narrated items begin.
- Items with narration are positioned sequentially using their measured audio length.
- Silent items use the configured silent-item duration, timing breaks use the configured break duration, and optional narration padding adds breathing room after spoken audio.
- The scene duration is fitted to the resulting arrangement. With the timeline disabled, item positions stay unchanged and Lazy Podcaster fits the scene duration to the narration or video that actually plays.
Narration must be generated before its exact length can be measured. Until then, the timeline shows an unmeasured narration span rather than guessing its duration.
Review conflicts
Audio bars show where each item’s narration runs. If narration runs into the next item, the timeline marks the overrun. If the last item runs past the scene end, use Extend scene to fit to lengthen the scene without manually calculating the duration.
To arrange one scene manually, open the scene’s timeline arrange control and use Arrange scene. The same popover controls silent-item durations, timing-break durations, narration padding, and whether automatic arrangement is inherited, on, or off.
Scene Effect Pills
Each scene card shows colored indicator pills for active effects:
| Pill | Meaning |
|---|---|
| BG | A background effect is active on this scene |
| AM | An ambient effect is active (particles, atmosphere, etc.) |
| FG | A foreground effect is active |
| IN | A scene intro transition effect is set |
| NARR | Narration audio is assigned to this scene |
| CAM | Scene camera — click to set the home view |
Items
An item is a piece of content placed on the whiteboard. Lazy Podcaster has four kinds of items:
🖼️ Graphic
Any picture you bring in — hand-drawn vector art, photos, icons, logos, or animated GIFs. Lazy Podcaster chooses the right animation behaviour automatically: vector art can draw itself on with the hand-drawn pen, while photos and GIFs reveal with a wipe or other entrance effect.
🔤 Text Card
Text you type directly in the app. Can animate as handwriting, a vertical write reveal, or one of several entrance effects.
⚙️ Prop
A plugin-powered animated element such as a countdown timer, progress bar, live chart, or speech bubble. Props compute their animation in real time, so they can do things a static graphic can't.
🎬 Transition
A "between content" item that animates the items above it out of the way as the items below come into view — without ending the scene.
Adding Items
On a scene card, click the + dropdown and choose:
- Graphic — opens the Asset Library to pick a picture (vector art, photo, icon, or animated GIF)
- Text — creates a new text item you can edit immediately
- Transition — inserts a transition item to separate the content above from the content below it
- Prop — opens a picker to choose an installed prop plugin
You can also drag a picture directly from the Asset Library panel onto the canvas to add it to the current scene. To add a new item between two existing items, open the item card's ⋯ menu and use Insert Above ▸.
Positioning, Resizing & Selecting
- Drag an item on the canvas to reposition it.
- Drag the corner/edge handles to resize. Hold Shift while resizing to keep proportions.
- Click an item to select it; clicking it in the canvas also expands its scene in the sidebar.
- Ctrl-click (or ⌘-click on Mac) additional items to add them to the selection. Multi-selected items get a single set of resize handles around the whole group.
- Lasso-select by dragging on empty canvas to rubber-band select multiple items.
Stretch an Image Without Keeping Its Proportions
Images keep their original proportions while Lock aspect ratio is enabled. To make an image taller or wider independently:
- Select the image on the whiteboard.
- In the Context Inspector's Arrange controls, click the checked Lock aspect ratio button to turn it off.
- Drag the image's resize handle downward to make it taller, sideways to make it wider, or diagonally to change both dimensions.
Leave Lock aspect ratio off to keep the image stretched. Turning it back on immediately restores the image's original aspect ratio; it does not lock in the stretched proportions.
Grouping
- Select two or more items, right-click, and choose Group Items. After grouping, clicking any member selects the whole group.
- To break a group apart, right-click any group member and choose Ungroup.
Right-Click Menu (Canvas)
Right-clicking an item on the canvas opens a context menu. Available options depend on the item type and current selection:
| Option | Available on | What it does |
|---|---|---|
| Find in Asset Library | Graphic items | Opens the Asset Library and scrolls to the source picture |
| Crop Image | Photos and other raster images | Opens the crop editor |
| Re-import GIF… | Animated GIFs | Reopens the trim & transparency editor |
| Retune Background Removal | Items with background removal applied | Reopens the background-removal editor |
| Annotate | All items | Adds a comment, instruction, or suggestion badge to the item |
| Settings | All items | Opens the full Item Settings modal (all effects & animation controls) |
| Toggle Visibility | All items | Hides or shows the item on the canvas (also available as the eye icon on the item card) |
| Duplicate Item | All items | Clones the item in the same scene |
| Move to a different scene… | All items | Picker modal to relocate the item to another scene |
| Group Items / Ungroup | 2+ selected / grouped item | Create or break apart an item group |
| Delete | All items | Removes the item (with confirmation) |
Item Card ⋯ Menu (Sidebar)
Each item card in the scenes panel has a ⋯ button that opens a popover with cascading submenus. This is where most per-item configuration lives:
| Menu | What it controls |
|---|---|
| Appearance Effect ▸ | Pick the entrance method (Hand-drawn, Fade In, Slide In, Pop In, Drop In, plugin effects, etc.) |
| Appearance Settings ▸ | Speed, drawing style, delay, and effect-specific parameters |
| Texture ▸ | (Photo / raster images) Tint, background fill, overlay textures |
| Presence Effects ▸ | Looping effect played while the item is on screen (Glow, Throb, Shimmer, etc.) |
| Exit Effect ▸ | Animation off the canvas (Fade Out, Fire Out, Shrink, plugin effects) |
| Exit Effect Settings ▸ | Delay, duration, and effect-specific parameters |
| Prop Settings ▸ | (Prop items) Plugin-defined configuration panel |
| Animation Loops | (GIF items) Loop count for playback (0 = infinite) |
| Insert Above ▸ | Insert a new Graphic / Text / Transition / Prop directly above this item |
| Duplicate Item | Clone the item |
| Move to different scene… | Relocate to another scene |
| Annotate | Add a comment, instruction, or suggestion to the item |
Item Card Indicator Pills
Each item card in the sidebar shows a small set of pills so you can see what's configured without opening any menus:
| Pill | Effect slot | What it shows |
|---|---|---|
| AP | Appearance | The appearance animation set for this item (e.g. Hand-drawn, Fade In, Pop In). Hover to see the current style name. |
| PR | Presence | A looping presence effect is active while the item is on screen (Glow, Throb, Shimmer, etc.) |
| EX | Exit | An exit effect is configured — this item will animate off-canvas at the end of its duration (Fade Out, Fire Out, Shrink, etc.) |
| NARR | Narration | Narration text is attached directly to this item (in addition to any scene-level narration) |
| CAM | Camera View | Item-specific camera behavior is configured |
| LOCK | Layout Lock | The item's position and size are locked; click to open Item Settings |
Pills are clickable — clicking a pill opens that slot's settings directly, the same as drilling through the ⋯ menu. Pills appear dimmed when no effect is configured for that slot.
Visibility, Annotations & Opacity
- Visibility toggle — every item card has an eye icon (also available via right-click → Toggle Visibility). Hidden items are skipped on the canvas but stay in the project so you can re-enable them.
- Annotations — attach a comment, instruction, or suggestion to any item. The item card and the canvas item display a small annotation badge so you (or a collaborator reviewing the project) can spot notes at a glance.
- Opacity — select the item, then adjust its rendered transparency either in the Context Inspector's dockable Common item controls toolbar or in the Item Settings modal. This also applies to text items.
Graphics
A graphic is any picture on your whiteboard — vector art, a photo, an icon, a logo, or an animated GIF. You don't have to tell Lazy Podcaster which kind it is; the app picks the right entrance behaviour for what you've added.
Bringing in graphics
Use the Asset Library (also reachable from the toolbar's search button) to find and import pictures:
- Browse your computer for image files
- Search the built-in online image sources (more sources can be added with image-search plugins)
- Import directly from a URL
Anything you import is added to your Asset Library and stays there for future projects.
The hand-drawn style
When a graphic is line-based vector art, you can give it the Hand-drawn appearance and Lazy Podcaster will draw it on the canvas with a virtual pen, stroke by stroke, the way you'd sketch it on a real whiteboard. Filled areas fade in after the outline is complete.
Clean line art — icons, diagrams, maps, simple illustrations — looks best with the hand-drawn pen. Photos and complex full-colour images use a quick reveal animation instead.
Editing animated GIFs on import
When you bring in an animated GIF, an editor opens so you can clean it up before it lands on your whiteboard. (You can reopen this editor anytime via right-click → Re-import GIF….) From here you can:
- Preview the GIF frame by frame with a play/pause button and frame counter
- Trim the start and end with a dual-handle filmstrip slider
- Remove a background colour with an eyedropper and a tolerance slider
- Optionally exclude enclosed areas so only the outer background is erased — useful when the GIF has eyes, holes, or pockets of background colour you want to keep
- Optionally keep only a chosen colour (± tolerance), erasing everything else
- Fill remaining transparent pixels with a solid background colour
Looping animated GIFs
For animated GIFs on the whiteboard, the item card's ⋯ → Animation Loops control sets how many times the GIF should loop while it's on screen. Use 0 for infinite looping (it will keep looping for the full time the item is visible).
Text Cards
Text cards let you type content that then animates onto the whiteboard.
Editing Text
Double-click a text item on the canvas to enter edit mode. Click outside to exit. Font, font size, and font color are set from the item's ⋯ menu.
Text Animation Styles
| Style | What happens |
|---|---|
| Hand-written | The pen traces actual glyph outlines for script-style fonts (true calligraphy feel) |
| Write | Each character is revealed with a vertical clip that slides open top-to-bottom |
| Fade In | The text fades up to full opacity |
| Slide In | The text slides into position from the chosen direction |
| Drop In | The text drops in from above and settles into place |
| Pop In | The text scales up with a small bounce |
The Hand-written style works best with script/calligraphy fonts such as Dancing Script, Caveat, or Pacifico. For regular sans-serif fonts, Write produces a clean reveal effect.
Props
Props are plugin-powered canvas items that render real-time procedural animations for their full display duration. Unlike SVGs or images, props compute and paint every frame dynamically — opening a category of content that would otherwise require dedicated motion graphics software:
- Countdown Timer — a live ticking clock; perfect for urgency sequences and event promos
- Animated Progress Bar — a percentage-fill bar that animates on cue; ideal for stats, goals, and skill breakdowns
- Live Chart — bar or pie charts that animate into final position as part of your scene
- Speech Bubble — animated speech / thought / exclamation bubbles attached to a character
- …and anything else a
.wbpropcan compute — the format is open to any canvas-based animation
Add a prop via + → Prop on a scene card. If multiple prop plugins are installed, a picker dialog lets you choose. Each prop has its own settings panel accessible via the item card's ⋯ → Prop Settings ▸.
Prop plugins use the .wbprop file extension and are installed via Settings → Plugin Manager.
Transitions
A transition item animates the content above it out of the way as the content below it comes into view — without ending the scene. Use transitions to chunk a long scene into visually separated beats while keeping the same narration, background, and intro/outro effects.
Add a transition via + → Transition on a scene card, or via ⋯ → Insert Above ▸ Transition on any item card. Configure the transition from its item card's ⋯ menu:
- Effect — slide, fade, or any installed transition plugin
- Direction — left, right, up, down (for directional effects like slide)
- Easing — ease-in-out, linear, etc.
- Pan Effect — optionally pan the background along with the transition; mirror direction available
- Scope — whether the transition acts on the previous block of items or stands alone
Transitions are different from scene intro effects. Scene intros animate the entry of a whole new scene; transition items animate content shifts within a single scene.
How Animation Works
When you press Play, each item passes through several lifecycle phases:
- Scene Intro Effect — the scene enters with a cinematic transition (panels slide in, globe spin, etc.)
- Item Appearance Animation — the item animates onto the canvas (hand-drawn, fade, slide, etc.)
- Presence Effect — while the item is fully visible, a looping effect plays (glow, throb, shimmer, etc.)
- Exit Effect — the item animates off the canvas before the scene ends (fade out, fire out, etc.)
- Scene Transition — the next scene's Intro Effect provides the visual exit; if no intro is set on the next scene, a direct cut occurs
All animation renders in an overlay layer on top of the canvas — the actual whiteboard items are never modified during playback. You can safely edit items at any time without affecting the animation system.
Item Duration
Each item has a configurable Duration, set in the item's ⋯ menu. It's the length of the item's entrance animation — how long the pen takes to draw an SVG, how long a Fade In takes to fade up, how long a prop runs, and so on. Default is 3 seconds.
What happens after the entrance finishes depends on whether the item has an exit effect:
- No exit effect — the item stays on screen until something else removes it: a transition leading to the next item, the next scene's intro effect, or simply the end of the project.
- Has an exit effect — the exit effect plays at the end of the item's duration (after any exit-effect delay you've configured), animating the item off the canvas.
In Simultaneous mode (Timeline off), prop items also get a per-item Delay slider in their Configure tab so you can stagger when each prop starts relative to the scene beginning. In Sequential mode, items just queue naturally in sidebar order — no delays needed.
Appearance Animations
Appearance animations control how an item enters the canvas. Set via the item's ⋯ menu → Animation Style or Appearance Effect.
| Effect | Works on | Description |
|---|---|---|
| Hand-drawn | SVG, Text (script fonts) | Pen traces SVG paths or glyph outlines in real time |
| Fade In | All | Item fades in from transparent |
| Slide In | All | Item slides in from a configurable direction |
| Drop In | All | Item drops from above with a bounce |
| Pop In | All | Item pops in with a scale spring |
| Stretch Bounce | All | Item stretches then snaps to shape |
Plugin Appearance Animations
The built-in set is just the start. Custom entrance animations can be added as .wbappearance plugins — effects like a typewriter reveal, neon flicker-on, hologram materialization, or any CSS or canvas-based entrance you can imagine. Once installed, the new effect appears immediately in every item’s Appearance menu.
Scene-Default Appearance
Set a default appearance effect for all items in a scene via Scene ⋯ → Item Defaults → Default Appearance. Individual items can override this or be set to follow the scene default.
Presence Effects
Presence effects are looping animations that play continuously while an item is fully visible — after its appearance animation completes and before its exit effect begins. This is where good explainer videos become unforgettable. A pulsating glow on a key statistic, flames rising beneath a call-to-action, a highlight shimmer sweeping across a product image — presence effects are the finishing touch that makes viewers stop and lean in.
Each item supports a stack of presence effects — multiple effects run simultaneously and are composited together. For example, you can combine Float (gentle bobbing) with Glow (pulsating halo) on the same item; both play at once, with Float's movement naturally carrying the Glow along with it.
Access via item ⋯ menu → Presence Effect.
| Effect | Source | Description |
|---|---|---|
| Glow | Built-in | A pulsating drop-shadow glow that traces the actual line contours of the item |
| Throb | Built-in | The item gently scales up and down in a breathing rhythm |
| Float | Built-in | The item gently bobs, drifts, and tilts as if suspended in air |
| Shimmer | Plugin | A travelling highlight band sweeps across the item's surface |
| Flames | Plugin | Procedural flame particles rise from the bottom edge of the item |
Managing the Effect Stack
The Presence Effect panel shows all effects currently applied to the item. Each row has:
- Toggle (●/○) — enable or disable that effect without removing it
- Effect name — click to change it to a different effect
- ⚙️ Settings — expand the settings panel for that effect (color, speed, intensity, etc.)
- ✕ Remove — remove the effect from the stack
To add another effect, click + Add Effect at the bottom of the panel and choose from the list of available effects.
Great combinations: Float + Glow gives a hovering luminous look. Throb + Glow makes a key statistic breathe with light. Float + Shimmer creates a shimmering, drifting highlight. Effects are fully composited — transforms and filters from each layer stack cleanly.
The built-in effects are just the starting point. Additional presence effects — including electric arc traces, neon halos, particle overlays, snow/rain cascades, and more — are available as .wbpresence plugins. Drag any plugin card directly from the Plugin Library onto an item card to apply it instantly, or choose it from the Add Effect list.
Scene-Default Presence
Set a default presence effect for all items in a scene via Scene ⋯ → Item Defaults → Default Presence. Items with their presence set to Scene Default will pick up whatever effect is configured for the scene.
Exit Effects
Exit effects animate an item off the canvas after its display duration expires. Without an exit effect, items remain on screen for the rest of the scene.
Set via item ⋯ menu → Exit Effect.
| Effect | Description |
|---|---|
| Fade Out | Item fades to transparent |
| Slide Out | Item slides off-canvas in a configurable direction |
| Shrink | Item shrinks to nothing at its center |
| Dissolve | Item dissolves into particles |
| Vanish | Item instantly disappears |
| Fire Out | Item burns away upward |
Exit Timing
Each exit effect has independently configurable Delay (time after the item's duration before exit begins) and Duration (how long the exit animation takes).
Scene-Default Exit
Set a default exit effect for the whole scene via Scene ⋯ → Item Defaults → Default Exit.
Transitions
Transitions control the visual effect between items in a scene (and between scenes when no scene intro is set). Configure the project default in Settings → App Defaults → Transitions or override per item.
Settings include effect type, direction, easing curve, and pan behavior. Custom transition plugins use the .wbtransition extension.
Intro Effects
Intro effects are scene-level cinematic transitions. Instead of individual items fading or sliding in one-by-one, the entire scene enters as a unified cinematic animation. With no intro effect, changing scenes is a direct cut. When an intro effect is selected, it controls how the new scene enters; depending on the effect, it may slide, pan, wipe, or cover the previous scene.
Set via Scene ⋯ → Intro Effect.
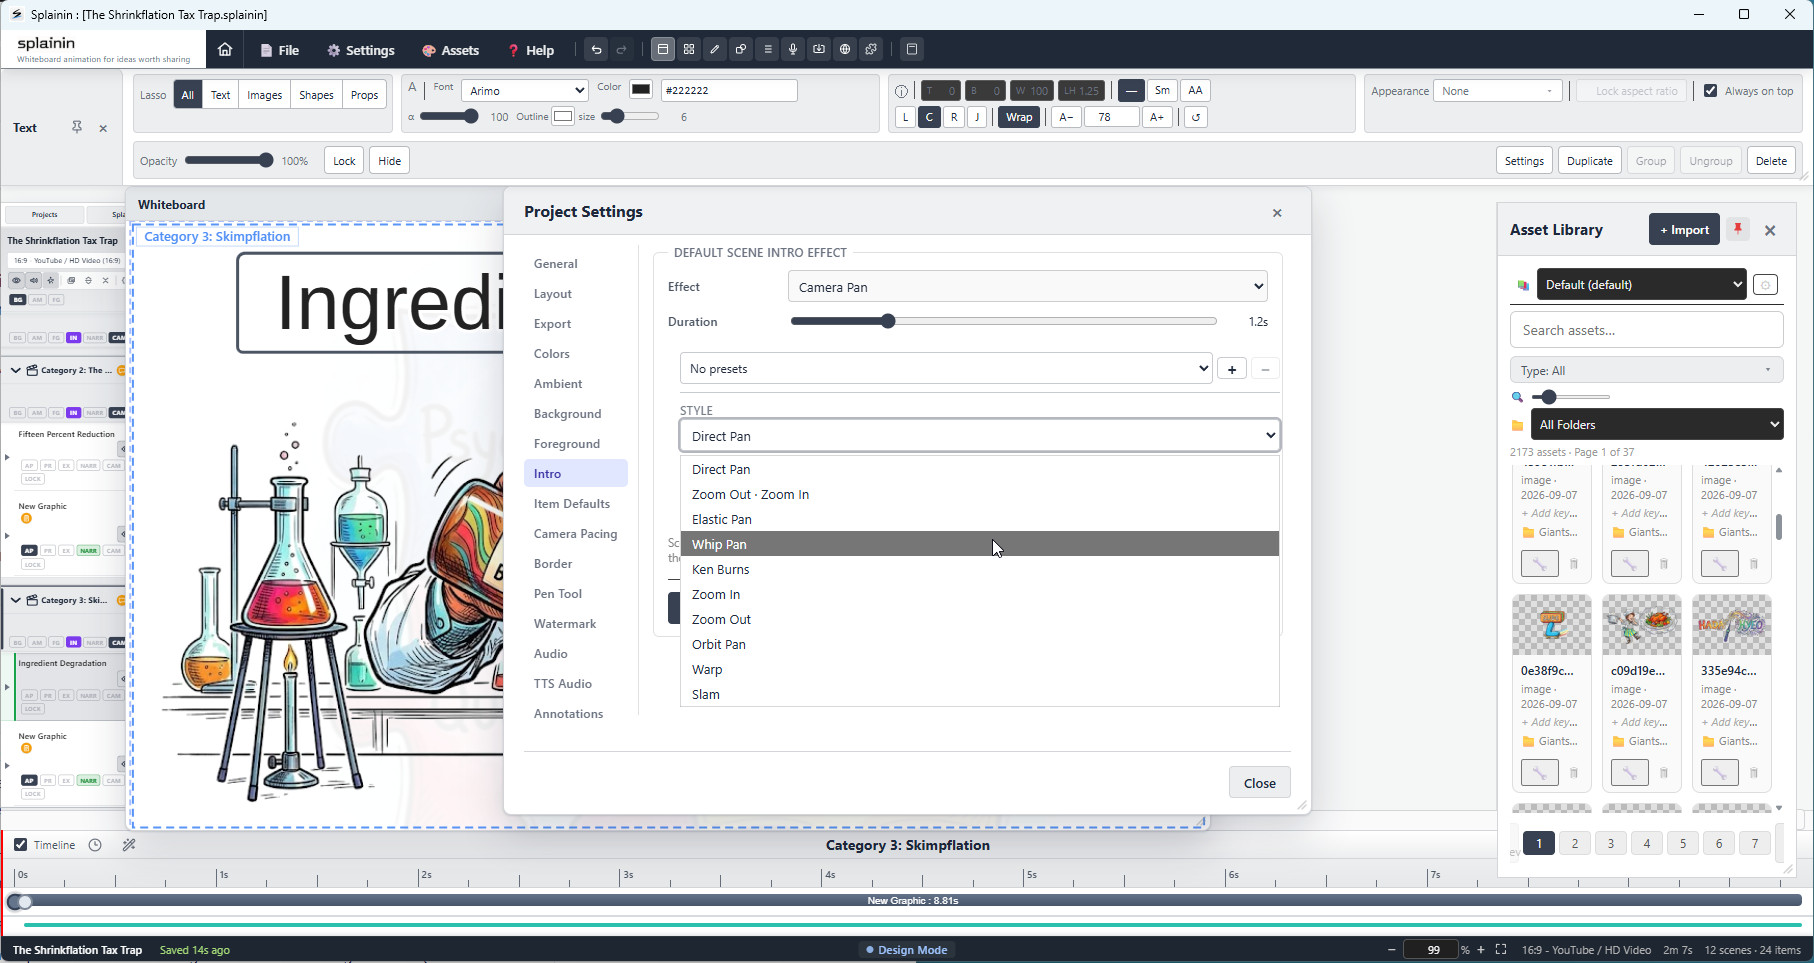 Screenshot: Scene ⋯ menu showing Intro Effect options with layout guide visible
Built-in Intro Effects
| Effect | Description |
|---|---|
| Sliding Banners | Canvas divides into vertical or horizontal panels that slide in from alternating directions. Configurable panel count (2–6), direction, stagger delay, and optional color tints. A layout guide shows panel boundaries. |
| Background Pan | The scene slides in from one direction as if the canvas is being scrolled — creates a natural, flowing sense of narrative continuity between scenes. |
| Round and Round | Scenes rotate as if mounted on a spinning globe — a show-stopping entrance that immediately elevates production value. Configurable direction and globe size. (Install via .wbintro plugin) |
Intro Effect Settings
When an intro effect is selected, click Intro Effect Settings to adjust its parameters. Effects that support it also have a Layout Guide option — toggling it overlays panel boundaries on the canvas so you can precisely position content within each panel.
Set a project-level intro default in Project Settings so every scene uses the same cinematic entrance with a single setting. Individual scenes can override or clear the project default as needed.
Applying via Drag-and-Drop
Drag an intro effect plugin card from the Plugin Library directly onto a scene card to apply it instantly. The IN pill also accepts drops.
Ambient Effects
Ambient effects are looping atmospheric overlays that fill the entire canvas behind your content — things like drifting particles or a living background. They play for the full duration of a scene.
Set via Scene ⋯ → Ambient Effect. Can also be set as a project-level default.
| Effect | Description |
|---|---|
| Floating Particles | Warm gold particles drift gently upward. Configurable count, speed, drift, and color. |
| Background Pan | The background image slowly pans across the canvas — creates a subtle "alive" feel on static backgrounds. |
Custom ambient plugins (.wbambient) can be installed for effects like rain, snow, starfields, or any canvas-based atmosphere.
Frame Effects
Frame effects render a decorative border or overlay around the whole canvas. They sit above all content and are included in exports.
Set via Scene ⋯ → Frame Effect. Can also be set as a project-level default.
| Effect | Description |
|---|---|
| Vignette | Dark gradient at the canvas edges, like a camera lens vignette. Configurable spread and intensity. |
| Shadow Box | A wood-frame-style border with depth and bevel. |
| Sketch Border | Wobbly hand-drawn lines forming an imperfect border — reinforces the whiteboard aesthetic. |
| Torn Paper | Ragged torn-paper edges, as if the canvas was torn from a notebook. |
| Film Strip | Classic film reel border with sprocket holes on both sides. |
Sketch Border and Torn Paper pair especially well with the hand-drawn animation style for an authentic notebook look.
Background Layers
The visible backdrop behind your content is built from three independently configurable layers:
| Layer | Pill | What it does |
|---|---|---|
| Background Effect | BG | Fills the canvas behind all items — can be a solid color, image, or a BG-type plugin effect |
| Ambient Effect | AM | Atmospheric overlay above the background but beneath items (particles, pan, etc.) |
| Foreground Effect | FG | Full-canvas overlay that sits above items but below the frame border |
All three layers can be set per-scene or as project-level defaults from Scene ⋯ menus and Project Settings.
Narration & Voices
A scene's narration is the spoken commentary that plays alongside the animation. You type the script, pick a voice, and Lazy Podcaster generates the audio for you — no microphone or recording booth required.
Where to change narration
Use the entry point that matches what you want to edit:
| What to change | Where to open it |
|---|---|
| One scene | Click the scene card's NARR pill. Lazy Podcaster opens Scene Settings → Narration. |
| One item | Click the item card's NARR pill. Lazy Podcaster opens Item Settings → Narration. |
| Existing narration across the project | Click Narration Manager in the main toolbar. It opens one bulk editor containing the existing scene and item narration for the active layout and language. |
| Voice across the project | Open Settings → Project Settings → TTS Audio, enable Use a project-specific default voice, choose the provider, voice, and speed, then click Apply voice across project. Per-scene and per-item narration can still override the project default. |
The project voice setting becomes the default for new scene and item narration. Apply voice across project changes all existing narration in the active layout to text-to-speech, including narration that currently uses recorded audio. Lazy Podcaster asks for confirmation before discarding saved clips so they can be regenerated with the new voice; paid providers may charge for that regeneration.
The scene and item Narration tabs let you:
- Type or paste the script
- Pick a voice from any installed voice provider
- Adjust speaking rate (0.5× – 2.0×)
- Adjust narration volume
- Preview the audio before committing
- Record narration from a microphone instead of using text-to-speech
- Export available narration audio to the Asset Library
Narration Manager
The Narration Manager is the fastest way to revise narration text throughout a project. It lists every existing non-empty scene and item narration in scene order for the active project layout and language. Each narration is a separate block divided by a blank line.
- Click Narration Manager in the main toolbar.
- Edit the narration blocks without adding or removing blocks.
- Click Update. The number of edited blocks must match the number shown in the status line.
The Narration Manager edits existing narration text; it does not create narration for scenes or items that currently have none. Use the appropriate NARR pill to add new narration or change voice, speed, volume, captions, recording, or saved audio. Changing text can discard generated audio that must be regenerated.
A scene card or item card displays the NARR pill whether or not narration has been entered; the pill is highlighted when that scene or item has narration.
Item narration and automatic timing
Item narration belongs directly to the item, not only to the scene. An item's narration can therefore be much shorter or much longer than the scene narration, and its measured audio length becomes part of that item's timeline slot.
- Open the item's narration controls from its item card or Item Settings and edit the spoken text.
- Generate or preview the narration so Lazy Podcaster can measure the resulting audio. The measured duration is shown in the timeline's item narration bar.
- When Keep scene timelines automatically arranged is enabled for the project or scene, Lazy Podcaster automatically rearranges the narrated item and the following items to fit the new length. The scene duration is fitted as needed, so you normally do not have to drag timeline diamonds or manually recalculate durations.
This automatic fit depends on automatic timeline arrangement being enabled. If it is off, item positions remain where you put them and you must adjust timing manually. If the scene timeline is disabled, item positions are not rearranged; Lazy Podcaster fits the scene duration to the narration or video that actually plays.
If a longer item narration collides with the next item, the timeline marks the overrun. If the last narrated item extends beyond the scene end, use Extend scene to fit. If narration has not been generated yet, Lazy Podcaster cannot know its exact length and shows the span as unmeasured until audio is available.
Voices & Voice Providers
Lazy Podcaster doesn't lock you into one set of voices. Instead, voices come from voice provider plugins, and you can install as many as you want.
Out of the box, Lazy Podcaster includes the Microsoft Windows voices provider — the built-in voices that ship with Windows. They run entirely on your computer, work offline, and are free to use. Great for drafts, prototyping, internal videos, or anything where ultra-realistic narration isn't critical.
For studio-quality, lifelike speech — the kind of voices you'd hear on a polished YouTube explainer or a TV ad — install one of the premium voice provider plugins. Today these include:
- OpenAI voices
- ElevenLabs voices
- Deepgram voices
- Azure AI Speech voices
- …and more being added over time. Browse the Plugin Library to see what's available.
These premium providers are run by their respective companies, and you sign up with them directly to get an API key (a private code that lets the plugin talk to their service on your behalf). You then enter that key into the plugin's settings:
- Open Settings → Plugin Manager
- Find the voice provider under TTS Voices
- Click the ⚙ Settings button next to it
- Paste your API key and save
From then on, that provider's voices show up in every scene's voice picker, right alongside the built-in Windows voices.
You're billed by each voice provider directly at their published rates — there's no Lazy Podcaster markup, no middleman, and no per-month subscription on top of your license. Pay only for what you actually generate.
Pre-render before exporting. Premium voice providers charge by the character. Once you're happy with a scene's narration, click Pre-render to WAV in the narration panel — the audio is saved with the project and re-used on every preview and every export, so you only pay to generate it once.
Premium voice providers require a Pro license to enable. Microsoft Windows voices are always free.
Narration Captions
Lazy Podcaster can display spoken narration as captions during playback and include those captions in the rendered output. Captions follow the scene narration unless a scene or item explicitly overrides the setting.
- Enable or disable the project-wide caption preference in the narration or project settings.
- Use the scene caption setting to override the project choice for a particular scene.
- Use an item caption override when a specific item should inherit, force, or suppress captions.
Preview captions with the final narration before exporting. Remove pause markers from the visible script when they are only being used to control speech timing.
Pen Customization
The pen is the little hand-and-pen image you see gliding across the whiteboard during a hand-drawn animation. It's what sells the illusion that someone is actually drawing, in real time, in front of the viewer.
Lazy Podcaster ships with a realistic default pen (a hand holding a marker), but the pen is just an image — so you can swap it out for anything: a different hand, a paintbrush, a fountain pen, a magic wand, a tentacle, a robot arm, your dog's paw, your own logo. If you can find or make a picture of it, you can use it as a pen.
The Pen Library
Open the Pen Library from Assets → Pen Library. It shows every pen that's installed — the built-in default plus any pens you've added yourself. From here you can:
- Set as Default — make this pen the active pen for the current project (or for all new projects, when set in App Defaults)
- Preview Drawing — play a quick sample stroke so you can see how the pen looks in action
- Calibrate — fine-tune the tip position, rotation, and size (see below)
- Delete — remove a custom pen you no longer need
Where to Get Pen Images
A "pen" in Lazy Podcaster is just a PNG or SVG. Some easy ways to find or create one:
🤖 Generate one with AI
Lazy Podcaster has a built-in browser (open it from the toolbar) so you can sit alongside your favourite AI image tool — ChatGPT, Midjourney, DALL·E, Gemini, Stable Diffusion playgrounds, whatever you prefer — and prompt your way to a custom pen without leaving the app. Try prompts like "a cartoon hand holding a bright red marker, transparent background, top-down view, PNG". When you have an image you like, save it locally and add it as a pen.
Of course, you can also do this in any external browser and just bring the file in.
🖼️ Find one online
Visit your usual stock-image and free-art sites (Pexels, Unsplash, Pixabay, Freepik, Flaticon, OpenClipart, Wikimedia Commons, Noun Project, etc.) right inside Lazy Podcaster's built-in browser, or in any browser of your choice. Search for things like "hand holding pen PNG transparent" or "paintbrush clipart", and download whichever one fits your style.
✏️ Draw your own
Use any image editor (Photoshop, Affinity, Procreate, Krita, GIMP, Inkscape, even MS Paint) to draw or trace your own pen. Save it as a PNG with a transparent background so it floats cleanly over the whiteboard, and you're done.
📷 Snap one yourself
Take a photo of your own hand holding a pen on a plain background, then use the GIF / image background-removal tools (or any photo editor) to knock out the background. Now your videos are literally drawn by you.
The pen needs a transparent background so it floats cleanly over the whiteboard instead of dragging a rectangular box behind every stroke. Don't worry about the file type, though — when you bring an image into the Asset Library, you get a Background Removal tab that can knock out the background of any image (PNG, JPG, GIF, whatever) with an eyedropper and tolerance slider, so you can turn just about any picture into a clean, transparent pen.
Adding a Custom Pen
- Open Assets → Pen Library and click Create New Pen.
- Click Browse Image and pick the PNG or SVG you found, generated, or drew.
- Give the pen a name you'll recognise later (e.g. "Red Marker", "My Hand", "Paintbrush").
- Click Calibrate to mark exactly where the pen tip is on your image, and to set the rotation and size.
- Click Save. The pen now shows up in the library and is ready to use.
If Create New Pen is unavailable under your current license, you can still choose an installed pen from the Pen Library and use it to draw the monster artwork. Creating a custom hand requires access to Create New Pen.
Calibrating the Pen Tip
Lazy Podcaster needs to know one important thing about your pen image: where the tip is. That's the point that has to follow each stroke as the drawing animates. The calibration tool lets you:
- Click on the pen image to mark the exact tip position (a red dot appears so you can see what's set)
- Rotate the image so the pen shaft is angled the way a right-hander would naturally hold it
- Adjust the overall size so the pen feels proportional to the canvas
Calibrate the tip precisely on the actual nib or brush point — even a few pixels off will make the strokes look like they're drifting away from the pen.
Pen Tip Particle Effects
Want sparkles, smoke, or confetti trailing the pen as it draws? Turn on a Pen Tip Effect in Settings → App Defaults → Pen Tool → Drawing Effect. For example, Confetti sprays colourful particles from the tip on every stroke — perfect for celebratory or kid-friendly content.
Stroke Tilt
When enabled, the pen image leans slightly in the drawing direction — clockwise on downstrokes, counter-clockwise on upstrokes — for a more natural, organic feel. Configured in App Defaults or per-project in Project Settings.
Asset Library
The Asset Library is your personal stockpile of every picture, animation, and audio file you've brought into Lazy Podcaster. Anything you import once is yours forever — across every project, every video, every revision. Your library grows with you.
It lives in a floating panel that you can keep open beside the whiteboard while you work. The panel is part of the Asset Browser, which has two sides:
- The Asset Library tab — your personal collection of imported assets, ready to drag onto the canvas.
- The Asset Importer — for bringing new assets in, with built-in editing tools (background removal, cropping, GIF trimming, flipping, and more).
Using Images in Commercial Videos
You can use Lazy Podcaster to create and distribute commercial videos, including client work, advertising, branded content, and revenue-generating projects, subject to the license type that applies to your purchase. However, importing, downloading, or saving an image in the Asset Library does not grant you ownership or commercial-use rights for that image.
Before using an image commercially, check the license, attribution requirement, and any other terms from its source. You are responsible for complying with those terms for images you import, capture, obtain through an image-search provider, or generate through a third-party AI service. Search results can have different rights: for example, NASA Images are identified as public domain, while Openverse results are Creative Commons licensed and the exact license can vary by image.
Do not assume that an image is cleared for commercial use just because it appears in a search result or has been added to your library. Review the source page and license for the specific image; provide attribution or obtain permission when its terms require it.
Opening the Asset Library
- Assets → Asset Library from the top menu
- The Asset Library button on the toolbar
- Drag the panel to wherever you like — it remembers its position, size, and whether you had it open last time
Editing an Asset from the Library
Yes. Each image, GIF, video, and SVG card in the Asset Library has an Edit button (the wrench icon). Click it to reopen the saved asset in the appropriate editor, then update the existing asset or save a new copy.
- Images and GIFs: reopen the Asset Importer editor for background removal, cropping, flipping, GIF trimming, transparency, and related cleanup.
- SVG sketches: reopen the Sketch tool with the saved drawing loaded. Use Update Existing to replace the library asset or Save as New to keep the original.
- Videos: reopen the video editor to trim the clip, then choose Update Existing Asset or save a new asset.
Multiple Libraries
Lazy Podcaster ships with a single Default library, but you can create as many additional libraries as you like — one per client, one per project series, one for personal experiments, whatever fits the way you work. Use the library selector at the top of the panel to switch between them; everything below the selector (search, filters, folders, thumbnail size) is scoped to the currently chosen library.
Click the ⚙ button next to the selector to open Manage Libraries:
- Create a new (empty) library by typing its name and clicking + Create.
- Rename any library to make its purpose clearer.
- Set Default — the default library is the one new imports go into when you haven't explicitly switched libraries; it's also where Lazy Podcaster looks for an asset whose origin library has been deleted.
- Delete a non-default library. Lazy Podcaster asks for confirmation; the library file is removed from the libraries folder.
- 📂 Open Folder — opens the libraries folder in Windows Explorer for advanced backup/restore scenarios.
Folders, Keywords & Project Tags
Asset organization is stored as metadata with each asset, so the same image can be found by its filename, keywords, folder, favorite status, or the projects that use it.
| Organization tool | How to use it |
|---|---|
| Folders | Assign an asset to a folder from its asset metadata or folder control. Use the folder filter to show one folder, or choose Unfiled for assets without a folder. New imports can use the active import folder. |
| Keywords / tags | Edit an asset's keywords from its metadata or context menu. Search matches filenames, keywords, narration text, voices, and project names, so use consistent tags such as character, background, client-a, or chapter-2. |
| Favorites | Star frequently used assets, then filter by ★ Favorites. |
| Project references | Lazy Podcaster tracks which projects use an asset. Use the project filter to find every asset used by a particular project. |
Libraries are separate from projects: organizing, renaming, or deleting a library asset does not remove an item already saved inside a project. Use folders for broad filing and keywords/tags for cross-folder search.
Items dragged onto your whiteboard remember which library they came from. If you later use Find in Asset Library on an item, Lazy Podcaster automatically switches to the right library and scrolls to the source asset — even if you have a dozen libraries.
Extract Project Assets to Library
Choose Assets → Extract Project Assets to Library… to copy reusable media embedded in the current project into an Asset Library. Lazy Podcaster inventories project images, video, audio, and baked narrations, removes duplicate sources, and lets you include or exclude each available category.
- Choose the current library or create a new library.
- Set the destination folder and select the media categories to extract.
- Click Extract. Lazy Podcaster opens the destination library and selects the first extracted asset.
If the project has no reusable images, video, audio, or baked narrations, there is nothing to extract. Extraction copies media to the library; it does not remove the original items from the project.
Create a Collage
Choose Assets → Create a Collage… to arrange every image item in the project into a single white-background PNG. The result is sized at 3840 × 2160, preserves each image's aspect ratio, and opens in the captured-image importer so you can review and import it. If the project contains no image items, or any project image cannot be loaded, no collage is created.
What You Can Do With Assets
Find what you need fast
- Search across filename, keywords, narration text, voice, or project name
- Filter by type — All, ★ Favorites, GIFs, Images, SVG, Audio, Videos, AI Narrations
- Filter by folder — assets you've sorted into custom folders show under their folder; everything else is in Unfiled
- Filter by project — instantly see every asset used in a specific project
- Thumbnail size slider to zoom in or out for easier scanning
Use them in your scenes
- Drag any thumbnail onto the canvas to add it as a new item in the current scene
- Click a thumbnail to preview it, then use it to replace the selected item's content
- Star your most-used assets as ★ Favorites for one-click access later
Keep things tidy
- Right-click an asset to rename it, edit its keywords, change its folder, or delete it from the library
- Lazy Podcaster automatically tags each asset with every project it's been used in, so you can always find "that hand-drawn arrow I used in the onboarding video" months later
Adding Assets — the Asset Importer
Open the Asset Importer from Assets → Asset Importer, its main-toolbar button, or the + Import button at the top of the Asset Library. It accepts almost anything visual or audible:
| Source | How |
|---|---|
| Files from your computer | Drag and drop into the Importer, or use the file picker. Accepts PNG, JPG, GIF, WebP, BMP, SVG, MP3, WAV, OGG, M4A, AAC, MP4, WebM, MOV, M4V, MKV. |
| Clipboard paste | Copy an image anywhere, then paste it directly into the Importer. |
| Online image search | Search free image sites — Pexels, Unsplash, Pixabay, SVG Repo, Openclipart, Flaticon, IconFinder, Wikimedia Commons, NASA Images, Openverse, Tenor, GIPHY, and more — right inside the app. Each source is provided by a small image-search plugin (.wbsearch); add or remove sources from the Plugin Library. |
| Built-in browser | Open the integrated browser to visit any site, then capture an image, a region, or even animated motion straight from the page. See below. |
Using the Built-in Browser
The built-in browser turns the entire web into a content source. Open it from the Asset Importer (the 🌐 Browser tab) and you have a full web browser running inside Lazy Podcaster. Use it to visit:
- Stock-image sites that aren't covered by an image-search plugin
- Your company's brand portal or a private image archive (you can sign in just like in any browser)
- AI image generators — ChatGPT, Midjourney, Gemini, DALL·E, Adobe Firefly, etc. — to generate visuals on the spot
- YouTube, Vimeo, social videos, news sites — anywhere with motion you'd like to grab
Three capture buttons sit at the top of the browser:
📸 Capture Image
Grabs a single picture from the page. Useful when you've right-clicked an image and want to bring it straight into your library, or when you want a quick snapshot of whatever's currently visible.
✂️ Capture Region
Click and drag a rectangle over any part of the browser window — a chart, a logo, one frame from a video, a portion of a webpage — and that exact area is captured as a still image and sent to the Importer.
🎞️ Capture Animated GIF
Drag a region, then press record. Lazy Podcaster captures everything happening in that region as an animated GIF — including a video playing on the page, an animation, a loading spinner, or even your own scrolling and typing. Press stop when you have what you need.
↩️ Bring it back
Whatever you capture is handed off to the Asset Importer's preview, where you can clean it up (background removal, crop, GIF trim, etc.) before saving it to your library.
Need a custom illustration? Open the browser, sign in to your favourite AI image tool, describe what you want, then capture the result. You can be drawing with a brand-new custom-generated image inside a minute.
Capture from Webcam
Record a video clip directly from your webcam — perfect for adding talking-head footage, testimonials, presentations, or B-roll that you can then import into your Lazy Podcaster project as a video asset. No screen-record needed, no external app required — just hit record and capture yourself on camera.
Open it from Assets → Record Webcam…, or open the Asset Importer and click the 🎥 Webcam tab.
Video assets imported this way can be animated in the whiteboard just like any other item — add entrance animations, transitions, presence effects, and more. Or use them as static background layers. The possibilities are wide open.
Live Preview & Framing
When you open the Webcam tab, you see a live preview of what your camera sees. Use the framing controls below the preview to compose your shot:
- Shape presets — choose the output aspect ratio and shape: 16:9 (widescreen), 4:3 (classic), 1:1 (square, perfect for social), 9:16 (vertical, for mobile), or Circle (for picture-in-picture bubbles with transparent corners).
- Zoom — zoom in 1× to 4× to frame your subject tighter or capture just a portion of the scene. The preview updates as you adjust.
- Pan — drag inside the preview to reposition what you're capturing (useful when zoomed in). Or use the arrow keys for precise adjustments.
- Reset — quickly return to 1× zoom and centered framing.
The shape preset you choose determines the recording resolution — 16:9 records at 1280×720, for instance. Taller presets (9:16, Circle) record at 720×1280 or 720×720 respectively, so they're crisp whether you're recording a talking head or a full-body shot.
Smart Camera Features
🎯 Eye Contact Assist
When this toggle is ON, Lazy Podcaster watches your eyes and subtly nudges the crop to keep your gaze steady and centered in the frame — even if you move around. This creates the illusion of direct eye contact, which is critical for testimonials, presentations, and any talking-head footage where connection matters. It's like having an invisible teleprompter that keeps your eyes locked in the ideal position.
📍 Auto-Framing (Follow)
When enabled and you've zoomed in enough to have headroom, Lazy Podcaster gently pans the frame to keep your face and eye-line in the sweet spot — no manual adjustment needed. Great for longer takes where you might move around naturally; the camera subtly follows you instead of drifting off-center. For best results, enable both Eye Contact Assist and Follow together.
📸 Background Control
Don't want to fuss with your room's lighting or background? Lazy Podcaster gives you three options:
- None — records what the camera sees, unmodified. Use this if you have a nice background or want to add one later.
- Blur — intelligently blurs the background while keeping you sharp and in focus. Perfect for at-home recordings where the background isn't ideal. Looks professional, instantly.
- Remove — makes the background completely transparent (alpha channel), so you can drop your footage over any Lazy Podcaster scene or graphic. Ideal for creating picture-in-picture effects where you appear on top of your whiteboard animation.
The blur and transparent-background features use AI-powered segmentation that runs right on your computer — no data leaves your machine, and the processing is fast enough for real-time preview. You'll see the effect applied to the live preview before you hit record.
Audio & Device Selection
- Microphone (on/off) — by default, Lazy Podcaster records your webcam's built-in mic (or whatever's set as default on your system). Uncheck the box if you only want video, or if your mic is giving feedback.
- Camera device — if you have multiple cameras (built-in + external), pick which one to use from the dropdown.
- Microphone device — if you have multiple audio sources (headset, USB mic, system audio), pick which one to record from.
Recording & Trimming
- Compose your shot using the framing controls and enable the features you want (Eye Contact Assist, Auto-Framing, background blur, etc.).
- Click ⏺ Record to start capturing. The live preview changes to show you what's actually being recorded.
- Speak, present, or perform — the timer shows how long you've been recording. Free-tier recordings stop at 30 seconds and show a five-second countdown; registered tiers use the 10-minute safety cap for a single take.
- Click ⏹ Stop (or press Esc) when you're done.
- The video editor opens with your clip. From here you can:
- Trim the start and end — drag the timeline handles to cut away false starts or ending faffing.
- Review — play through to check audio levels, focus, and framing.
- Import — save to your Asset Library as a video asset ready to use.
Re-recording: If the first take wasn't quite right, the editor has a Re-record button that takes you back to the live preview without closing the interface. Record again, and the new clip replaces the old one in the editor — perfect for nailing that testimonial or presentation in one seamless workflow.
File format: Webcam recordings are saved as WebM video with audio (if enabled), which imports into your Asset Library and plays back in the whiteboard just like any other video. All modern browsers and video editors support WebM, so you can also pull the file out and use it elsewhere if needed.
Editing Assets on Import
Whatever the source, the Importer's preview gives you a set of cleanup tools before the asset lands in your library — so it's ready to use without further fuss:
- Background removal — pick a colour with the eyedropper (or colour picker), use the tolerance slider to control how loosely it matches, and the edge softness slider to feather the cutout. Optionally exclude enclosed areas so holes in the picture (eyes, windows, gaps in a logo) stay intact, or keep only black to convert a busy image to clean black line art.
- Crop — trim away anything you don't want.
- Flip horizontally or vertically.
- GIF trim & transparency — for animated GIFs, set the start/end frame, remove a background colour, and tune transparency before import.
The Importer treats every image the same way — file format doesn't matter. A JPG photo, a PNG icon, a GIF clip, or an SVG illustration can all have their backgrounds removed at import time. The version saved into your library is the cleaned-up one, ready to drop straight onto the whiteboard.
Where Your Libraries Live
Each library is stored as a single self-contained .wblib file in your Lazy Podcaster app data folder (%AppData%\LazyPodcaster\libraries\ on Windows). The default library is named default.wblib; libraries you create get filenames derived from the names you give them. Each file contains every asset in that library plus its metadata (keywords, folders, favourites, project usage).
You don't need to manage these files directly — but they're plain ZIP archives, which makes them trivially easy to back up, copy to another computer, or hand to a colleague. The 📂 Open Folder button in Manage Libraries takes you straight there.
The Asset Library and your projects are independent. Deleting an asset from a library won't break any existing project that already uses it, and removing an item from a project doesn't delete it from the library.
Sketch Tool
The Sketch tool is a built-in vector drawing pad for making your own SVG artwork without leaving Lazy Podcaster. Use it for quick custom illustrations, simple icons, hand-drawn-style accents, stop-motion frame sequences, and lip-sync mouth shapes for talking-character props.
Open it from 🎨 Assets → Sketch…. The Sketch window opens as a floating, draggable, resizable panel that stays on top of the whiteboard so you can reference what you're drawing into.
Everything you draw is saved as vector SVG — clean, scalable, and resolution-independent. Sketches export with a fully transparent background and land directly in your Asset Library, ready to drop onto any scene.
Drawing Tools
| Tool | What it does | Hold Shift for… |
|---|---|---|
| Select | Click a shape to select it; drag a marquee to grab several. Drag the bounding box to move, the corner handles to resize, the green circle above the box to rotate. | Add/remove shapes from the selection (with click); snap rotation to 15° increments (with the rotation handle). |
| Pen | Freehand drawing with automatic path smoothing. A single tap leaves a small dot; full strokes become smooth Bezier curves. | — |
| Line | Straight line from where you click to where you release. | Snap angle to 0° / 45° / 90°… |
| Arrow | Same as Line, but with an arrowhead that scales with the stroke width. | Snap angle to 45° increments. |
| Rectangle | Drag from corner to corner. | Constrain to a perfect square. |
| Circle | Drag from one point to another to make an ellipse. | Constrain to a perfect circle. |
| Eraser | Click or drag across a shape to delete the whole stroke. Erases one shape at a time. | — |
Stroke, Fill & Smoothing
Stroke
Pick a stroke color and a width (1–40 px). The width also affects how aggressively the smoothing algorithm simplifies the path — thicker lines get smoothed more so thin details aren't lost.
Fill
Tick the Fill checkbox to give shapes a solid interior color. Leave it unchecked for outline-only artwork. The fill color applies to new shapes from that point forward; existing shapes aren't retroactively recolored.
Smoothing
Three levels control how much hand-jitter is removed from your strokes:
- Faithful — minimal smoothing, preserves every wiggle. Great for stylus users who want authentic hand-drawn texture.
- Natural (default) — moderate smoothing for most users.
- Clean — strong smoothing for ultra-polished strokes (helpful when drawing with a mouse).
Pen pressure
If you're drawing with a stylus or graphics tablet, enable Pen pressure so stroke width varies naturally with how hard you press. Mouse drawing always uses constant width.
Editing What You've Drawn
Switch to the Select tool, then:
- Move — drag inside the selection.
- Resize — drag any of the eight handles around the bounding box.
- Rotate — drag the green circle above the box. Hold Shift to snap to 15° increments.
- Nudge — arrow keys move 1 px; Shift+arrows move 10 px.
- Delete — press Delete or Backspace.
- Multi-select — Shift+click to add or remove shapes; or drag a marquee in empty space (hold Shift to add to the existing selection).
Standard Ctrl+Z / Ctrl+Y work for undo and redo (60-step history). The Clear button wipes the canvas.
Saving & Naming
Above the canvas there's a Name field and an optional Folder field. Pick names that'll make sense in your Asset Library later.
| Button | What it does |
|---|---|
| ➕ Save as New | Saves the current drawing to the Asset Library as a new SVG. Auto-suffixes the name to avoid collisions — save "sketch" once and you get sketch-0001; save it again and you get sketch-0002, and so on. |
| 💾 Update Existing | Available after you've loaded an existing sketch (see below). Replaces the saved asset with your edited version. Stays disabled until you've loaded something to update. |
The auto-numbering makes the Sketch tool perfect for frame sequences. Save your first frame as something like "dance-frame", and every subsequent save becomes dance-frame-0002, 0003, and so on — sorted in order in the Asset Library, ready to use as a stop-motion sequence.
Re-opening a Saved Sketch
To edit a sketch you saved earlier, open the Asset Library, find the SVG, and click its Edit (✏️) button. The Sketch window opens with that sketch loaded — make your changes, then click 💾 Update Existing to replace it (or Save as New to create a copy).
Animate a Stick Figure (Stop Motion)
Yes. Use the Sketch tool's onion skin to draw the poses, then play the saved frames with the built-in Sketch Stop Motion Animation prop:
- Open Assets → Sketch…, draw the stick figure's first pose, enter a series name and folder, then click Save as New.
- Enable 👻 Onion. The previous saved frame appears faintly behind the drawing so you can move the limbs while keeping the character aligned.
- Edit the next pose and click Save as New again. Lazy Podcaster gives the frames naturally sortable names such as
walk-0001.svg,walk-0002.svg, and keeps them together in the same Asset Library folder. - On a scene card choose + → Prop, select Sketch Stop Motion Animation, then open the prop item's ⋯ → Prop Settings ▸.
- Set Imported Frames to the folder containing the sketches. Choose Frames / sec from 1–30 (default 6), turn Loop on or off, and optionally choose a Mouth Style for lip-sync.
The prop plays the folder's SVG files in natural filename order for the item's duration. This is frame-by-frame stop motion, not skeletal rigging: pose the limbs separately in each saved sketch.
Onion Skin Controls
Tick the 👻 Onion checkbox to overlay your previous saved sketch faintly behind the current one — perfect for drawing a series of frames where each one needs to align with the last. Adjust the opacity slider to taste (5–80%, default 30%). Every time you save, the new drawing becomes the next frame's onion backdrop.
Mark as Mouth (For Lip-Sync Animation)
If you're creating a custom talking character, you can mark one shape as the mouth anchor:
- Draw a simple mouth shape (an oval, a smile curve, whatever placeholder you like).
- Select it with the Select tool.
- Click 🗣 Mark as mouth in the toolbar.
A green dashed outline appears around the marked shape so you can spot it later. When you use this sketch with the Sketch Stop Motion prop, the prop knows exactly where to composite the animated lip-sync mouth on top of your drawing — at the right position, scale, and rotation.
Transparent Background Slider
The Transparent BG slider controls how see-through the editor's drawing surface is — from 0% (you can see the whiteboard right through the Sketch window) to 100% (an opaque white drawing surface). Useful for tracing or aligning a sketch against your actual scene. The saved file is always transparent regardless of this setting; it only affects the editor display.
Sketch is built for quick custom artwork that fits the rest of your project, not full-featured vector illustration. If you need precise typography, advanced path editing, or image tracing, do that work in a dedicated vector editor (Inkscape, Illustrator, Figma) and import the SVG via the Asset Importer.
Plugin Library
Almost every visual effect in Lazy Podcaster — every transition, every entrance animation, every shimmering glow, every animated prop, every voice, every image-search source — is delivered as a plugin. That means your copy of Lazy Podcaster is never "finished": as new plugins are released, your toolbox keeps growing. You can also create your own.
Open the Plugin Library from 🎨 Assets → Plugin Library, or from the toolbar. It's a floating panel you can keep open beside the whiteboard.
The Three Tabs
| Tab | What's there |
|---|---|
| Installed | Everything currently installed on your machine, grouped by type. Use the ⚙ icon on a card to configure plugins that need settings (e.g. an API key for a premium voice or image-search service). Use the ✕ to uninstall. |
| Browse | The online catalog of plugins available for download. Has two sub-tabs:
|
| Pens | A dedicated tab for pen images and pen-effect plugins, since those are the two pieces that combine to make a pen. |
Plugin Types
Each plugin is a single file with one of these extensions. You don't need to remember the extensions — Lazy Podcaster sorts and labels them for you — but they're useful when downloading, sharing, or backing up:
| Extension | Type | What it adds |
|---|---|---|
.wbappearance | Appearance Animation | New ways for items to enter the scene (beyond the built-in Hand-drawn, Fade, Slide, Drop, Pop, etc.) |
.wbpresence | Presence Effect | Looping overlays that play while an item is on screen — sparkles, electricity, halos, breathing, wobbles… |
.wbtransition | Transition | New visual transitions between scenes or between items inside a scene |
.wbintro | Intro / Outro | Cinematic entrance or exit effects that play across the entire scene |
.wbambient | Ambient Effect | Full-canvas atmospheric backgrounds — particles, weather, gradients, soft motion |
.wbframe | Frame Effect | Decorative borders and overlays around the canvas edge |
.wbprop | Prop | Animated, procedural canvas elements you place like items — clocks, charts, characters, gauges |
.wbpen | Pen Effect | Particles or sparks that follow the pen tip while it draws |
.wbmouth | Mouth / Viseme Set | Mouth-shape sets that animate in sync with narration on talking-head props |
.wbtts | TTS Voice Provider | Adds a text-to-speech provider — OpenAI, ElevenLabs, Deepgram, Azure AI Speech, etc. (Pro license + API key required for premium providers) |
.wbtranslate | Translation Provider | Adds a provider for translating project text and narration when creating localized layouts |
.wbscript | AI Script Provider | Adds an AI provider for generating project scripts, outlines, and structured Lazy Podcaster project JSON |
.wbimage | AI Image Provider | Adds an AI provider for generating images from annotated image-item prompts |
.wbsearch | Image-Search Source | Adds a new searchable site to the Asset Importer (Pexels, Unsplash, SVG Repo, GIPHY, Tenor…) |
.wbpublish | Publishing Destination | Adds an upload or publishing destination to the export workflow |
.wbtool | Tool Plugin | Adds an app tool or workflow extension |
Installing Plugins
From the online catalog
- Open Plugin Library → Browse.
- Pick Official or Community.
- Click any plugin card. It downloads, installs, and is immediately available everywhere it applies.
From a file
- Drag a plugin file (any of the extensions above) onto the Plugin Library window — or onto the main whiteboard window.
- You can also use the + Install button and choose the file from disk.
Plugins you install are yours forever — they don't depend on a single project. Once installed, an Appearance plugin shows up in every item's Appearance menu; an Ambient plugin shows up in every scene's Ambient menu, and so on.
Configuring Plugins
Some plugins need a one-time setup — typically an API key for a paid online service. On the Installed tab, plugins that have settings show a small ⚙ icon. Click it to enter your key (or other configuration), and Lazy Podcaster remembers it from then on.
Two common cases:
- Premium voices (OpenAI, ElevenLabs, Deepgram, Azure AI Speech) — open Plugin Library → Installed → TTS Voices → ⚙ on the provider, paste in your API key.
- Premium image search (some image-search sources require a free API key from the source site) — open Plugin Library → Installed → Image Search → ⚙ on the source.
Applying Plugins
Once installed, plugins appear automatically wherever they apply:
- Appearance, Presence, and Exit effects appear in each item's effect menus and on the AP/PR/EX pills
- Ambient, Frame, Intro/Outro, and Background-Music effects appear in each scene's effect menus
- Pen effects appear in the Pen Library
- Voice providers appear in the voice picker on every narration card
- Image-search sources appear as new tabs in the Asset Importer's search
You can also drag a plugin card straight from the Plugin Library onto a target on the whiteboard:
- Drag an Appearance, Presence, or Exit plugin onto an item to apply it to that item.
- Drag an Ambient, Frame, Intro/Outro, or Background-Music plugin onto a scene's thumbnail in the Scenes panel to apply it to that scene.
- Drag a Prop plugin onto the canvas to add it as a new prop item.
Create Your Own Plugins
You can build your own plugins using whichever AI assistant you prefer (ChatGPT, Claude, Gemini, etc.). Lazy Podcaster ships with a set of AI instruction files that explain to the AI exactly how a Lazy Podcaster plugin is structured — its file format, the functions it must implement, the canvas APIs it can call, and so on. You hand the instruction file plus your description ("make a presence effect that makes the item gently wobble like jelly") to your AI, paste the resulting plugin file back into Lazy Podcaster, and you have a brand-new effect.
The AI Plugin Creator UI is still being polished and is hidden by default in the current build. The instruction files themselves are included with the app, so advanced users who want to experiment can still use them with their AI of choice.
Lazy Podcaster Asset Vault
Open the Lazy Podcaster Asset Vault button in the left project sidebar to browse the Character Roster of talking characters.
- Search the roster by character name or keyword.
- Play a sample to preview a character with narration and mouth animation.
- Add to Asset Library to install a character for use in your projects.
The roster shows whether a character is free or requires app registration.
Image & Talking Characters
Image Characters are configurable talking-character props. They can switch among several character images while narration plays, animate a procedural or image-based mouth, appear inside a framed bubble, and act as the narrator for one item, a scene, or the whole project.
Find the Included Talking Characters
- Open Lazy Podcaster Asset Vault from the left project sidebar.
- Select Character Roster. Search the roster or select a cast member to inspect it.
- Click Play Sample to preview the character with narration and mouth animation.
- Choose the Asset Library where you want the character stored, then return to the Vault and click Add to Asset Library.
- Open the Asset Library, use the Characters type filter if needed, and drag the character onto the canvas.
The roster includes over 70 animated talking characters, including 22 original cast members, with more characters added regularly. Their poses transition smoothly while narration plays. All characters are downloaded online rather than bundled with the app. Four of the original characters are available free; registration-required characters need Lazy Podcaster Pro registration to be installed. Click Refresh to check for new characters. An internet connection is needed to load the roster and fetch characters for the first time. Previously downloaded samples can be replayed from the cache when offline; characters already installed in an Asset Library remain available. Playing a sample does not install the character. Characters are added to whichever Asset Library is active when you click Add to Asset Library.
Search by character name or keywords, such as soldier or robot. A character's keywords are retained when the character is installed in an Asset Library.
Use the Card Size slider to show more characters at once or larger thumbnails; your size preference is saved. Select a character to see its preview on the right. Play Sample and Add to Asset Library stay above the preview, so you can use them without scrolling away from the character. Expand Voice options for information about narration voices.
Configure a Character
Open the character item card's ⋯ → Prop Settings ▸, or open Item Settings → Configure. The main options are:
- Images → Open Image Character Builder… — add, remove, reorder, and preview as many as ten character images from the Asset Library. Each image can be included in or excluded from animation and can have its own random weight, mouth position, mouth size, mouth angle, and attached image props.
- Cycle Images — switch poses or expressions while narration is active. Set Seconds Per Image and choose Sequential or Random order. Random weight controls how often each enabled image is selected.
- Smooth Pose Transitions — enabled by default for new image characters when Cycle Images is turned on; you can disable it per character. Existing saved settings are preserved, and older characters without this setting retain instant pose changes until you enable smoothing. Smooth characters always cycle sequentially; Random order and random weights remain available when smoothing is off. The mouth follows each transition while remaining synchronized with narration. Transition Duration (ms) adjusts the transition from 150–1200 ms, defaulting to 400 ms. The actual transition is limited to half Seconds Per Image so each pose still has a hold; changing this slider does not rebake. Item play, scene play, project play, and export automatically prepare and retain missing transitions before starting, with progress and cancellation. Editing previews reuse available transitions and use instant pose changes for missing ones without starting a bake. Saving a smooth character to the Asset Library includes its bake; the frames travel with the character when added to a project or shared. Reordering, adding, removing, or disabling images reuses valid pairs and bakes new neighbors; artwork or attached-prop changes regenerate affected pairs. Mouth placement and timing changes do not require rebaking.
- Add Animated Mouth and Default Mouth Style — enable lip sync and choose either a procedural mouth or Viseme Images.
- Display in Bubble — crop the character into a circular presenter bubble, with optional background and frame colors.
To build a character from your own artwork, first import each pose or expression into the Asset Library. Add a new prop with + → Prop → Image Character Builder, open its Image Character Builder, click + Add first image, and drag Asset Library images into the preview area. Click Apply when finished.
Make a Character Talk: Narration Roles
A character's images and mouth respond to narration. In Prop Settings, choose its Narration Role:
| Role | Behavior |
|---|---|
| This item only | The character talks for narration attached directly to its own item. Use the item's NARR pill or the Narration Manager to add and generate that narration. |
| Scene narrator | The character cycles images and animates its mouth for each following narration in that scene, until another scene narrator appears. |
| Project narrator | The character is pinned to the camera and remains the narrator throughout the project. A scene narrator temporarily takes over until the next scene. |
Only one Image Character can be the project narrator. Choosing Project narrator changes any previous project narrator back to This item only.
Use Image-Based Viseme Mouths
A viseme is a visible mouth shape for a speech sound. A Viseme Mouth Set packages image-based mouth shapes as one reusable Asset Library item. Use one when the built-in procedural mouths do not match your character's artwork.
- Open Viseme Mouth Set Builder from its button in the main toolbar. You can also choose Create Mouth Set… after selecting Viseme Images as a character's mouth style.
- Name the set, optionally choose an Asset Library folder, and drag Asset Library images into the twelve slots: Rest / Idle, MM, T/D/TH, S/Z, AH, EE, IH, OH, OO, W/Q, F/V, and L.
- Fill Rest / Idle, which is required. Empty optional slots use the nearest available shape and ultimately fall back to Rest.
- Click Save or Save As. The set appears in the Asset Library under the Viseme Mouth Sets type.
- On the Image Character, enable Add Animated Mouth, choose Viseme Images under Default Mouth Style, then drag the mouth-set card from the Asset Library onto the Mouth Set field.
The character stores an independent snapshot of the mouth set. Editing the library copy does not change characters already using it; drag the updated set onto the character again to replace its snapshot. Replacing a set preserves that character's mouth position, size, and rotation.
Save a Customized Character for Reuse
After configuring an Image Character, open its item card's ⋯ menu and choose Save Character to Asset Library. Name the character and Lazy Podcaster saves its images, mouth settings, narration role, bubble settings, and other configuration as a reusable Character asset in the active Asset Library.
Context Help
Startup guided-tour cards have been retired. Context help remains available:
- Context help — small ? controls attached to particular panels and tools. Open one to read help for that exact control without leaving the project.
Use context help while a panel is open: it is tied to the current control and is more specific than the general guide.
Annotations
Annotations let you attach production notes to any item, scene, or the project itself — useful for instructions, revision markers, or comments for collaborators.
Adding Annotations
Right-click an item on the canvas and choose 💬 Annotate…, or use the ⋯ menu on any item card, scene card, or project header.
Annotation Types
- 💬 Comment — a general note
- 📋 Instruction — a production directive
- 💡 Suggestion — a proposed change
Options
- Placeholder — shows a dashed border on the canvas item as a visual reminder that content needs placing
- Dismiss on Edit — automatically removes the annotation once the item's content is replaced or its text is edited
Annotated items display a small badge on the canvas and on their sidebar card. The annotation popover is draggable and stays open until explicitly closed.
Export Video
When your project is ready to render, open File → Export Video. The Export Settings dialog handles WebM video and animated GIF output. Lazy Podcaster then plays the project from start to finish, captures every frame and audio source, and saves the result to disk.
Publishing to YouTube
The YouTube publishing tab can keep separate connections for multiple YouTube channels, including Brand Accounts. Choose the destination in the Channel selector before generating the video. The playlist list reloads for that channel so a video cannot be assigned to a playlist owned by a different connection.
- Click Connect another channel…, complete Google's authorization, and choose the required channel or Brand Account in Google's flow.
- Switch the Channel selector whenever you need a different upload destination.
- Click Remove connection… to forget the selected channel's authorization without affecting other connected channels.
Each destination channel must be authorized separately. Entering a channel ID cannot redirect an existing authorization to another channel.
Export Settings
| Setting | Choices | Notes |
|---|---|---|
| Format | WebM Video, MP4 Video, MOV Video, Animated GIF | WebM is the fastest native video path. MP4 and MOV re-encode for broader compatibility. GIF is for short, low-motion clips. |
| Resolution | 480p (SD), 720p (HD), 1080p (Full HD), 1440p (2K), 4K (Ultra HD) | The shorter side of the chosen preset is matched to your project's aspect ratio (16:9, 9:16, 1:1, etc.). The exact output size in pixels is shown live in the dialog. |
| FPS | 10, 15, 24, 30, 60 | 30 fps is the default and looks great. 60 fps for very smooth motion. 24 fps for a cinematic feel. Lower values shrink file size. |
| Quality (WebM only) | Low (2.5 Mbps), Medium (5 Mbps), High (10 Mbps), Ultra (20 Mbps) | Higher = larger files but cleaner compression. Medium is the sweet spot for most online uses. |
| Scenes | All Scenes (Full Project), or any individual scene | Useful for re-rendering one scene after a quick fix without sitting through the whole project. |
| Hold Last Frame (GIF only) | Off, 1, 2, 3, 5 seconds | Pauses on the final frame before the GIF loops, so viewers can read the closing visual. |
| Aspect Ratio & Output Size | (read-only) | Mirrors the project's aspect ratio (set in Project Settings) and shows the exact pixel dimensions you'll get. |
Click Start Export. The settings you pick are remembered next time, and the dialog itself is draggable and resizable.
What Gets Recorded
Lazy Podcaster captures the full whiteboard exactly as it would play in Preview, including:
- Every animated item — graphics being drawn, text appearing, props animating
- All Appearance, Presence, and Exit effects on items
- Scene-level effects: Ambient, Frame, and Intro/Outro
- The background colour and background image
- The watermark, if you have one configured
And, in the audio track:
- Narration — Lazy Podcaster uses the audio it has already rendered for each scene. Narration is rendered the first time you preview or play a scene, then cached on the scene; export simply reuses that cached audio. Only scenes whose narration has never been rendered (or whose text/voice/rate has changed since) are rendered just before recording starts.
- Background music set in Project Settings
- Pen sounds while items are being drawn
- Any per-scene audio
This means re-exporting a project never re-bills you on premium voice providers as long as you haven't changed the narration text, voice, or speech rate. Cached audio is reused.
The final fully-drawn frame is held briefly before the recording cuts, so the video doesn't end abruptly and the platform's auto-generated thumbnail captures the finished art.
During Export
While exporting, Lazy Podcaster shows a recording indicator and plays through the project. The animation runs in the foreground so you can keep an eye on progress. Don't switch away or interact with the canvas while the export is recording — it's a live capture.
When playback finishes, the file is handed off to a native Save As… dialog so you can choose where to save it. WebM exports save with a .webm extension; GIF exports save as .gif.
Animated GIF Export
GIF is a great choice for short looping clips, social previews, and embedding in documentation, but the format has real limits. Lazy Podcaster's GIF dialog defaults to sensible values for these use cases:
- Defaults to 480p at 10 fps on a single scene
- Auto-stops at 30 seconds of recording to keep file size and memory under control — you can hit Stop earlier to save what was captured up to that point
- Supports the Hold Last Frame option to pause on the closing visual
Animated GIFs aren't suited to long, high-resolution, or high-motion content — the file size grows quickly and quality drops. For anything longer than a few seconds, export as WebM instead.
A Single Frame as an Image
To save just the current canvas as a still image (PNG), use 🎨 Assets → Capture Whiteboard as Image… Useful for thumbnails, social previews, or grabbing a single illustration out of a project.
Tips for Best Results
Preview each scene first
Hit Play on each scene before exporting. That bakes the narration audio for every scene up-front, lets you spot-check timings, and means the export itself just reuses the cached audio — no waiting for voice generation in the middle of the export.
Pick the right resolution
YouTube and most platforms upscale 1080p beautifully — you usually don't need 4K. Reserve 4K for when the destination explicitly benefits from it.
Match FPS to your motion
Mostly drawn explanations? 30 fps is plenty. Lots of fast pans, props, or particle effects? Go to 60 fps. Quick social previews? 24 fps still feels smooth.
Single-scene re-exports
Made a small change to one scene? Use the Scenes dropdown to render just that scene and stitch it in externally — much faster than re-exporting the whole project.
Export Layer Order
For the curious, scenes are composited from bottom to top in this order during export:
- Background colour + background image
- Background Effect canvas
- Ambient Effect canvas (when set to render behind items)
- Animation overlays (graphics, text, images, props, presence effects)
- Foreground Effect canvas
- Ambient Effect canvas (when set to render in front of items)
- Intro Effect canvas (when active)
- Frame Effect
- Watermark
Export Scenes to PDF
Use File → Export Scenes to PDF… to turn whiteboard scenes into a portrait PDF. Each exported scene becomes a page containing the captured scene artwork and its selected narration text.
Choose What to Export
- Included scenes — export the project's included scenes.
- Current scene — export only the scene currently active.
- Selected scenes — export scenes selected in the scene list. This option is disabled when no scenes are selected.
Choose Narration Text
| Option | PDF content |
|---|---|
| None | No narration text. |
| Scene narration | Scene-level narration only. |
| Scene + item narration | Scene narration plus narration attached to individual items. |
Click Export PDF, wait for the scene capture to finish, then choose the output location in the native save dialog. PDF export is available in the desktop app.
Export for Sharing
Use File → Export for Sharing… when you need to send someone an editable project rather than a rendered video. Lazy Podcaster creates a single .lazypodcasterpack bundle containing the current project and its required assets.
- Save or otherwise flush the latest project changes.
- Choose File → Export for Sharing… and select a destination.
- Send the resulting
.lazypodcasterpackfile to the other Lazy Podcaster user.
The sharing bundle omits project snapshot history so it stays focused on the transferable project and assets. Keep the original .lazypodcaster file if you need its Project History.
Export a Scene as an Image
Choose File → Export Scene as Image… to save the current scene as a still image. Use this for thumbnails, handouts, documentation, social graphics, or a single finished whiteboard frame without rendering the full project.
Capture GIF
Records any rectangular area inside the Lazy Podcaster window as an animated GIF — handy for capturing the whiteboard canvas mid-animation, a particular tool or panel in the app, or any other on-screen action you want to turn into a reusable asset.
Open it from 🎨 Assets → Capture Whiteboard as GIF….
Need to capture something on a webpage? Use the built-in browser's GIF capture instead — it can grab in-page video, live web content, or anything else playing inside the integrated browser.
How It Works
- A red dashed capture frame appears in the middle of the window with a toolbar attached underneath.
- Drag the frame to position it, drag the bottom-right corner to resize. The size readout above the frame updates as you go.
- Pick your settings in the toolbar (see below), then click ⏺ Record.
- The frame turns solid red and the timer starts. Recording stops automatically at the max duration, or click ⏹ Stop (or press Esc) to end early.
- When recording finishes, the GIF Importer opens — trim the start/end, optionally pick a colour to make transparent, then click Import as GIF to send it to your Asset Library.
Toolbar Controls
| Control | What it does |
|---|---|
| 🔒 / 🔓 Drag lock | When locked (default), you can grab anywhere inside the frame to drag it. Unlock if you need to click through the frame to interact with whatever's underneath while you set up your shot. |
| Preset | Standard records at the frame's native size. Thumb 128px downsizes the result to 128×128 (used for plugin thumbnails — locks FPS to 15 and duration to 3s). |
| FPS | 5, 10, 15, 20, 25, or 30 frames per second. Higher FPS = smoother but larger file. |
| Duration | Maximum recording length: 3, 5, 10, or 15 seconds. |
| ⏺ Record / ⏹ Stop | Starts and stops the capture. The timer in the toolbar shows elapsed time. |
| × | Cancel and close the overlay without recording (Esc does the same when not recording). |
Capturing the whiteboard mid-animation: position the frame over the canvas, click ⏺ Record, then immediately press Spacebar (or click Play in the playback bar) to start the scene. The GIF will capture the animation as it plays.
Frame position, size, and toolbar settings are remembered between captures, so you can fire off several GIFs in a row without re-configuring each time.
Capture Video
Choose 🎨 Assets → Capture Video… to record a rectangular region of the screen as a video asset. In the desktop app, the capture region can include content outside the Lazy Podcaster window; in browser fallback mode, the selected region is cropped from a display-share stream.
- Position and resize the capture region.
- Choose the capture frame rate, duration, and any available audio options.
- Click Record, perform the action you want to capture, then stop recording.
- Review the result, re-record or discard it, or save it to the Asset Library as a video.
Captured video assets can be placed on the whiteboard and animated like other video items. The native recorder can also preserve interaction events for demo recordings when that option is enabled.
Capture Screen / Window
Choose 🎨 Assets → Capture Screen / Window… when you need to capture a whole display or an application window rather than a manually selected rectangle. Use this for software demos, walkthroughs, and other screen-based source material.
Screen and window capture is a recording workflow, not the same as Capture Whiteboard as GIF…. Use GIF capture for a short animated GIF asset; use video capture when you need video playback, audio, or a longer recording.
Watermark
Lazy Podcaster supports two independent watermark layers. You can use the app-level watermark for a mark that applies across projects, and a project-level watermark for branding specific to one project. If both are enabled, both appear in exports; when they overlap, the app-level watermark draws on top.
| Layer | Configure it here | Scope |
|---|---|---|
| App watermark | Settings → App Defaults → Watermark | Global default used across projects. |
| Project watermark | Settings → Project Settings → Watermark | Saved with the current project and added on top of the app watermark. |
Use the app watermark for your studio, channel, or product identity. Use the project watermark for a client logo, campaign mark, course name, or other project-specific branding. This lets one project export with both a global mark and a project mark.
The settings below apply to either watermark layer. Select the matching tab to configure the app-level or project-level watermark independently.
Settings
| Setting | What it does |
|---|---|
| Enabled | Master on/off for that watermark layer. Disable one layer while leaving the other active. |
| Show on whiteboard | Live preview toggle — overlays the watermark on the whiteboard while you tweak settings, so you can see size and position changes in real time. This is just a preview; it doesn't change your saved settings or affect the editor outside this panel. |
| Position | Where the watermark sits on the frame: Bottom-Right (default), Bottom-Left, Top-Right, Top-Left, or Center. |
| Size | 3% – 100%, applied against the basis you pick below. Default is 5%. |
| Size Basis | Which canvas dimension the size percentage measures against:
|
| Opacity | 5% – 100%, in 5% steps. Default is 30% (subtle ghost). Crank it up if you want a fully opaque mark. |
| Custom Logo | Click Browse to pick your own logo from anywhere the Asset Importer can reach — your computer, the clipboard, an online image search, or the built-in browser. PNG with transparency works best, but SVG, JPG, GIF, and WebP all work too. Click ✕ to clear it and revert to the default Lazy Podcaster watermark. |
Turn on "Show on whiteboard" while you set things up. You'll see the watermark live on the canvas at the same size and position it'll have in the export, so you can dial in opacity and position without doing test renders.
Lazy Podcaster enforces a minimum visible size (32px tall, or 4% of canvas height — whichever is bigger) so the watermark never disappears into a tiny speck on 4K exports or ultra-wide canvases. If you set a very small percent, the floor kicks in automatically.
The watermark you configure here is your branding. The free version of Lazy Podcaster also burns a small Lazy Podcaster mark on exports — a Pro license removes that. See Unlock the Full Experience for details.
All Built-in Effects — Quick Reference
These are the effects that ship with Lazy Podcaster out of the box. Anything further you want is a one-click install away from the Plugin Library.
Effects fall into two scopes:
- Item-level — applied to one specific item on the canvas (an SVG, a piece of text, an image, a GIF, a video, a prop). Set on the item itself, or as a scene default that applies to every item in the scene.
- Scene-level — applied to the whole scene (a background atmosphere, a frame around the canvas, an entry animation when the scene begins).
Item-level: Appearance (how items appear)
Pick one per item, or set a scene default. The right choice depends on what kind of item you're animating.
| Effect | Best for | What it does |
|---|---|---|
| Draw | SVG, Image, GIF | The classic hand-drawn pen-stroke reveal — the pen traces the actual contours of the artwork. |
| Paint | All items | The pen "paints" the item in with a brush stroke as it fades in. |
| Scan | Image, GIF | A scan-line laser sweeps across the item, revealing it as it goes. |
| Reveal | All items | Soft fill-fade reveal — gentler than a hard fade, with no pen. |
| Fade In | All items | Smooth opacity fade from invisible to fully visible. |
| Slide In | All items | Slides in from off-canvas. Configurable: direction (left, right, top, bottom). |
| Pop In | All items | Springs in from zero size with a little overshoot bounce. |
| Drop In | All items | Falls from above with a gravity-style bounce on landing. |
Item-level: Presence (what items do while visible)
Optional ongoing animation that plays for as long as the item is on screen. Use sparingly — one item glowing draws attention; everything glowing is just noise.
| Effect | Applies to | What it does |
|---|---|---|
| Glow | All items | Pulsing aura around the item. Configurable: frequency, intensity, color, max blur, max cycles. |
| Float | All items | Gentle bobbing/hovering motion. Configurable: frequency, intensity, tilt, drift, roughness, max cycles. |
| Throb | All items | Rhythmic scale pulse — squeeze and expand. Configurable: frequency, intensity, max cycles. |
| Stretch Bounce | All items | Elastic squash-and-stretch anchored to the item's base. Configurable: frequency, intensity, baseline, falloff, drift, roughness, max cycles. |
| Ken Burns | Image, SVG | Slowly zooms and pans an item while it remains visible. Choose a zoom-in or zoom-out motion, adjust the zoom and pan amounts, and enable Begin immediately when the motion should start as the item appears. |
| Ricochet | All items | Bounces an item around the whiteboard like a billiard ball. |
| Sticker Outline | All items | Adds a die-cut-style outline and optional shadow around the visible content. |
Item-level: Exit (how items leave)
Optional — items stay on screen by default. Add an exit effect when an item should disappear partway through a scene.
| Effect | Applies to | What it does |
|---|---|---|
| Fade Out | All items | Smooth opacity fade to invisible. |
| Slide Out | All items | Translates off-canvas. Configurable: direction (left, right, top, bottom, auto). |
| Shrink | All items | Scales to nothing. |
| Dissolve | All items | Blur-and-scatter dissolve. |
| Vanish | All items | Instant cut — item disappears in one frame. |
| Fire | SVG, Image | Burns away with flames consuming the artwork. |
| Erase | SVG, Image | An eraser rubs the item out. Configurable: eraser shape (circle/rectangle), width, height. |
| Rockets Away | SVG, Image | Item launches off with rocket thrust and a smoke trail. Configurable: nozzles, thrust intensity, smoke amount, "out of control" wobble. |
Item-level: Props (extras you attach to items)
Props are reusable overlays that live on top of an item — speech bubbles, animated mouths, search bars, and so on. Attach via the item's effects pill or drag a prop from the Plugin Library onto the canvas.
| Prop | Attaches to | What it does |
|---|---|---|
| Speech Bubble | SVG, Image, Text | A speech or thought bubble with a directional tail. Configurable: style (speech/thought), text, tail direction, fill, border, font size, tail length. |
| Standalone Mouth | All items | An animated mouth that lipsyncs to the scene's narration audio. Configurable: mouth model picker. |
| Search Bar | SVG, Image | An animated search-bar UI overlay (someone "typing a search"). Configurable: search text, font scale, bar/text/button/icon/border colors, border width, glow, sound, volume. |
| Sketch Stop Motion Animation | SVG frames | Frame-by-frame stop-motion animation built from an Asset Library folder of sketches. Configurable: Imported Frames folder, FPS, loop, mouth. |
| Animated Travel Route | Prop | Draws a visible route and animates a traveler through editable waypoints. |
| Arrows | Prop | Provides configurable arrow shapes for callouts, diagrams, and annotations. |
| Bottts Robot | Prop | A customizable animated robot character. |
| Character Builder | Prop | Builds mix-and-match hand-drawn character illustrations. |
| Checkbox | Prop | Displays a configurable check, cross, or checkbox mark. |
| Energy Waves & Beams | Prop | Creates animated waves, beams, particles, rays, lasers, and electric arcs. |
| Lucide Icons | Prop | Browses and places icons from the Lucide library. |
| Lazy Podcaster 2x2 Puppet Head | Prop | Animates a four-pose talking-head sprite sheet from narration. |
Scene-level: Ambient (ongoing background atmosphere)
| Effect | What it does |
|---|---|
| Floating Particles | Drifting luminous particles that float upward through the scene. Configurable: count, min/max speed, drift, color. |
| Infinite Canvas Grid | A world-aligned dot or line grid that adapts as the camera pans and zooms. |
| Static Image | A background image from your asset library that can slowly zoom or pan. Configurable: image, zoom, X/Y offset, mirror, opacity, pan direction. |
Scene-level: Frame (border around the canvas)
| Effect | What it does |
|---|---|
| Vignette | Soft radial darkening at the edges. Configurable: intensity, spread, color. |
| Film Strip | Classic film sprocket-hole bars on the top and bottom edges. Configurable: bar height, hole size, hole spacing, color. |
| Shadow Box | A wooden picture-frame border with bevels and a drop shadow. Configurable: frame width, color, shadow size. |
| Sketch Border | A wobbly hand-drawn pencil border around the canvas. Configurable: wobble, stroke width, color, passes. |
| Torn Paper | Natural-looking torn-paper edges with paper-fiber wisps. Configurable: tear depth, color, shadow. |
Scene-level: Intro (scene entry animation)
Plays once when the scene begins, before the items start appearing.
| Effect | What it does |
|---|---|
| Scene Pan / Wipe | Uses a scene-level transition to move, wipe, or otherwise reveal the new scene. The exact motion depends on the selected intro effect; without an intro effect, scenes change by direct cut. |
| Camera Pan | Glides the camera from its current position to the new scene's world location. |
| Image Wipe | Moves a chosen Asset Library image across the canvas to reveal the new scene. |
| Background Pan | Camera-style pan across the scene with parallax against a static-image ambient background. Configurable: pan X/Y, target zoom, speed, ambient boost, ambient offset. |
| Sticky Banners | Decorative banner panels slide in from alternating edges. Configurable: panels, direction, retain colors, stagger. |
Want more? Open the Plugin Library → Browse tab. The Official and Community catalogs add new entrance animations, presence effects, exit styles, ambient backgrounds, frames, intros, props, voices, and pen styles. New plugins keep getting released — your toolbox grows over time at no extra cost.
Keyboard Shortcuts
Shortcuts are skipped while you're typing in a text field, so Ctrl+S in a text box still works the way you expect.
Project
| Shortcut | Action |
|---|---|
| Ctrl+S | Save the current project |
| Ctrl+Shift+S | Start screen capture when screen capture is enabled |
| Ctrl+O | Open a project file (.lazypodcaster or .json) |
Editing
| Shortcut | Action |
|---|---|
| Ctrl+Z | Undo |
| Ctrl+Y or Ctrl+Shift+Z | Redo |
| Ctrl+A | Select all visible items |
| Ctrl+Shift+A | Select items in the current view |
| Ctrl+C | Copy selected items |
| Ctrl+X | Cut selected items |
| Ctrl+V | Paste items or a clipboard image |
| Ctrl+D | Duplicate selected items |
| Delete or Backspace | Delete the selection |
| F2 | Edit the selected text item |
| F4 | Open settings for the selected item |
Canvas & View
| Shortcut | Action |
|---|---|
| Ctrl++ | Zoom in |
| Ctrl+- | Zoom out |
| Ctrl+0 | Fit the active scene |
| Arrow keys | Nudge selected items |
| Shift + arrow keys | Nudge selected items farther |
| Space | Play or pause |
| Shift+Space | Play the active scene from the playhead |
| Esc | Deselect or close |
Canvas Gestures
| Shortcut | Action |
|---|---|
| Ctrl + click | Add or remove an item from the selection |
| Alt + click | Select without zooming from the sidebar |
| Ctrl + drag | Duplicate and move an item |
| Ctrl+Shift + drag | Move content within its frame |
| Alt+Shift + click | Focus the item's scene |
Resize Handle Modifiers
While dragging an item's bottom-right resize handle:
| Modifier | What it does |
|---|---|
| (no modifier) | Resize the item |
| Ctrl + drag | Rotate the item's content |
| Shift + drag | Skew the item's content |
Universal Dialog Patterns
| Shortcut | Action |
|---|---|
| Esc | Close the current dialog or cancel the current edit (rename fields, crop overlays, capture overlays, etc.) |
| Enter | Confirm the action — accept a rename, OK a confirm dialog, commit a crop, and so on |
Presentation
| Shortcut | Action |
|---|---|
| Space, Enter, Right, Down, or Page Down | Advance to the next scene |
| Left, Up, Backspace, or Page Up | Return to the previous scene |
| Shift + Previous | Go to the previous scene without replaying it |
| Esc | Exit fullscreen presentation |
Help
| Shortcut | Action |
|---|---|
| Ctrl+/ | Open the searchable Shortcut Keys window |
Sketch Editor
Open the Sketch… tool from the 🎨 Assets menu to draw your own SVG. Inside the editor:
| Shortcut | Action |
|---|---|
| Ctrl+Z / Ctrl+Y | Undo / Redo your drawing actions |
| Delete or Backspace | Delete the selected shape(s) |
| ↑ ↓ ← → | Nudge the selected shape 1 px (10 px with Shift) |
| Esc | Cancel the in-progress drawing or deselect |
Best Practices
For Hand-Drawn-Style Videos
- Use SVG linework icons. Simple line-art SVGs produce the most authentic hand-drawn look. Avoid SVGs that consist entirely of opaque filled shapes with no strokes — they will still animate but the pen tracing is less convincing.
- Keep SVGs clean. Remove hidden paths, clip-paths, and duplicate shapes before importing. Simpler SVGs animate more predictably and perform better.
- Calibrate your pen. Taking 60 seconds to mark the pen tip position and set the rotation makes the animation look far more polished.
- Match animation speed to narration cadence. Aim for SVG drawing to complete just as the narrator mentions that element. Adjust item duration in the item's ⋯ menu.
Constructing Effective Scenes
- One idea per scene. Each scene should cover a single concept. This keeps videos focused and editing manageable.
- Use sequential mode for step-by-step content. Items appearing one-by-one as narration mentions them is more engaging than all items popping up at once.
- Add presence effects sparingly. A single glowing element draws attention powerfully. Presence effects on every item create visual noise.
- Use the layout guide. When using Sliding Banners intro effects, enable the layout guide overlay before arranging content — it shows exactly how the canvas will be divided.
Narration & Audio
- Pre-render narration before exporting. This avoids re-calling the TTS API on every export run and guarantees consistent audio timing.
- Microsoft voices are free and offline — ideal for prototyping and drafts. Switch to a premium cloud provider for final production.
- Keep scene narration under 30 seconds. Longer narration usually means the scene is covering too much; consider splitting it into two scenes.
Performance & Export Quality
- Use a solid background color rather than a background image unless the image is meaningful content — it speeds up rendering significantly.
- GIFs: lower the frame rate. 10–12 fps is usually sufficient and keeps file sizes manageable. Animated GIFs are not well-suited for high-motion content.
- Export at native canvas resolution. Upscaling in post is almost never worth it — export at the aspect ratio and pixel size you actually need.
Plugin & Effect Organization
- Use scene-default effects rather than setting the same appearance/presence/exit effect on every item individually. It's faster and makes bulk changes a single edit.
- Drag-and-drop from Plugin Library onto scene cards or item cards rather than navigating through menus — it's significantly faster for multi-scene setups.
- Set a project-level intro default if every scene should share the same cinematic entrance. Individual scenes can then be given their own overrides only where needed.
For Educators
- One concept per scene, no exceptions. The most effective educational whiteboard videos present a single idea, let it land, then move on. Resist the urge to pack multiple points into one scene — break it up.
- Use sequential animation mode. Items appearing in sync with narration — one at a time — mirrors the cognitive approach that makes whiteboard teaching so effective. Let each element breathe before introducing the next.
- Pre-render narration for consistent playback. Once you’ve finalised your script and chosen your voice, pre-render each scene’s narration to WAV. This ensures the audio is perfectly timed and the video exports identically every time.
- Export 16:9 for YouTube / LMS, 9:16 for Instagram / TikTok. The same lesson content can serve both channels with just an aspect-ratio change and a quick item re-layout — no need to recreate content from scratch.
- Use Annotations to mark scenes for later revision. Add an Instruction annotation to scenes that need updating next semester so you know exactly what to revisit without re-watching the whole project.
- Organise by unit or module. One
.lazypodcasterfile per lesson or topic keeps things manageable. The Asset Library retains all your graphics across projects, so your visual library grows with every lesson you build.
For Small Businesses
- Lead with the problem you solve. The most effective business explainer videos open with the customer’s pain, not the product. Your first scene should make the viewer feel understood. Subsequent scenes introduce your solution, one step at a time.
- Keep the full video under 90 seconds. For website or social use, 60–90 seconds is the sweet spot. Aim for 8–12 scenes with tight narration — viewer retention drops sharply beyond that unless the audience is already ready to buy.
- Use Sliding Banners or Background Pan intros for a polished brand feel. Nothing signals professional production faster than a cinematic scene entrance. Set a project-level default intro so every transition reinforces your brand identity.
- Export multiple aspect ratios from the same project. Your website wants 16:9. Instagram Reels wants 9:16. LinkedIn wants 1:1. Change the aspect ratio in Project Settings, adjust item positions, export again — your content is repurposed in minutes.
- Add your logo as a watermark. Configure your branding in Settings → App Defaults → Watermark. Every export carries your brand automatically, at whatever position and opacity you choose — including customer-facing deliverables.
- Use AI narration for a consistent brand voice. A Pro license unlocks cloud AI voices that sound consistent across every video you produce — no recording booth, no re-takes, no microphone required.
Help, Support & Licensing
The Help menu collects Lazy Podcaster's reference, support, legal, update, and license commands:
| Command | What it opens |
|---|---|
| Hotkeys / Shortcut Keys | The in-app keyboard shortcut reference. |
| User Guide | This guide in a separate window. |
| Video Tutorials | The Lazy Podcaster tutorials website. |
| Register License | The license activation dialog. You can also click the amber Unregistered — Click to Activate indicator when it is visible. |
| Send Feedback | The in-app feedback form. |
| Check for Updates | Asks the desktop app to check for an available update. |
| End User License Agreement | The current license agreement. |
| Privacy Policy | The current privacy policy. |
| About | The installed Lazy Podcaster version, build type, website, and support address. |
Report a Bug or Send Feedback
To report a bug, choose Help → Send Feedback, select Bug report, and describe the issue. You can optionally attach a screenshot and provide contact details. Lazy Podcaster includes system diagnostics with the submission to help investigate the problem.
Contact Lazy Podcaster
Lazy Podcaster does not publish a separate administrator email address. For general support, licensing, or company inquiries, email [email protected]. For bug reports or product feedback, email [email protected] or choose Help → Send Feedback. For privacy requests, email [email protected].
Register or Remove a License
To activate Lazy Podcaster, choose Help → Register License, enter the key from your purchase email, and click Activate. Get a License opens the purchase page. On an activated installation, the same dialog shows the current status and a Remove License command; removing it frees this machine's activation and you can reactivate later.
🔓 Unlock the Full Experience
Lazy Podcaster is free to get started. Every core tool is available from day one — build real, complete projects and export actual videos before spending a penny. A Pro license removes the export watermark, unlocks cloud AI narration (bring your own OpenAI / ElevenLabs / Deepgram / Azure key), includes a year of free updates, and adds priority support and premium plugin releases.
For the full Free vs. Pro comparison and current pricing, see the Pricing page on lazypodcaster.com. Already have a license key? Open Help → Register License and enter it — Pro features activate instantly, no reinstall required.
Lazy Podcaster Whiteboard Animation · User Guide · © 2026